Invoice approval
This manual gives an overview, how to use invoice approval in ERPLY Books. This is a solution, that requires someone to check the invoices before sending these out for paying. This module is not mandatory.
Manual describes the following:
- What is invoice approval?
- How to use invoice approval?
- What are the invoice approval rules?
- How to add files to invoice and how to approve these?
- Process
- Different invoice statuses
What is invoice approval?
This is a function makes paying for invoices safer. User can choose the certain people who have to approve invoices. If you add file(s) to invoice(s), then you can use the system as a digital archive.
How to use invoice approval?
In order to use the invoice approval function, you must choose the rules that determine, how the confirmation process will look like.
Different options:
- Invoice must be approved before sending it for payment
- Option: Invoice can’t be made before confirming the file:
- Use invoice approval
- There must be a certain number of verifiers for approving the file
- In additon to certain number of verifiers, there must be the main approver.
How to add files to invoice and how to confirm these?
You can add files to existing invoice:
Go to “Purchases” > “Purchase Invoices” > “Open payables”. Choose file, that you want to add to the invoice. File format can be XML, PDF, PNG and JPG. Save the choosed file and also save the invoice.
You can see the added files when you open the purchase invoices and you click on the last button on the row (click on a “Print” button). A window will open where you can see all the added files. In order to download the file (in PDF format), click on the file).
- Option: The software will not confirm the invoice when there is no file.
- You can create the invoice, but you can’t confirm it before the confirmation rules are all set.
You can confirm file that has a status “Not confirmed” and no added files when you go to “Settings” > “Configuration” and remove the tick after “Use invoice approval”. Then you don’t have to use invoice confirmation functions.
Confirmation process
Verifier/ data entry:
- The software will ass a verifier under the organisations privileges.
- You can give privileges to users, when you go to “Settings” > “Users”. You will see a list of users. Make a double-click on the user e-mail and a list of privileges will open.
- Verifier is a person who has controlling rights.
- If verifier only controlls, then it’s reasonable to remove the right to enter the purchase invoices. Remove the tick in “Edit – Purchase Invoices”. Then save all the changes
Adding the verifiers
Go to “Settings” > “Configuration” > chapter “Invoice approval rules”. Add the number of approvers and the main approver.
In the chapter “Automatic e-mail approval process” you can determine the order for sending emails. Click on a button “Manage” and add a number and email address. Verifiers, who’s number is “1”, will get the e-mail first, who’s number is “2”, will get the email next etc.
Process
You can confirm invoice or file – depending on what’s the company’s rules.
- If all you invoices must be archived in the system, then use the invoice confirmation (invoice can’t be made without a file). After you have made invoice from confirmed file, system will change the status to confirmed automatically. Therefore, you can’t make “confirmed” invoice that has file with a status “not confirmed”. If one verifier approves the invoice and the other one rejects it, then the invoice is rejected. Invoice is confirmed when there are no rejections.
- If you receive the files later, then it’s reasonable to make the invoices – because the accountant can’t confirm these, they will stay in “not confirmed” status. Then the verifier can confirm the invoices (or wait for the files, confirm then and then the accountant can connect the files and the invoices).
Use your mobile phone for the invoice approval
Approve invoices with mobile – that means you can do it in any time and in any place. You do not have to sit in your office and be logged in to ERPLY Books.
You will receive approval email once someone sends an invoice into purchase inbox – Manager can approve/reject invoices even when waiting the elevator.
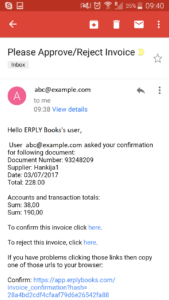
You can create rules to send approval request automatically when someone receives or approves an invoice.
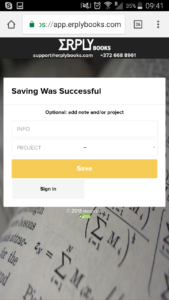
In addition, you can add notes and projects once you have approved/rejected invoice.
NB! You can click on the link once. It means that if you click on the “Reject” link and you actually wanted to confirm, then you can’t use the same email links again. You have to log in to confirm or ask for the new email.
Different file statuses
- Not confirmed – waits for confirmation
- Pending – the user approved the file and can make an invoice
- Confirmed – invoice has been made from file
You can add accountant when you go to “Settings” > “Users”. Then click on the “+Add” button. Fill in the needed information. If you want to change the existing user to accountant, then you have to remove the authorization and then add the person again with right role. Also, click on the user’s email and remove the privilege “Settings – Attribute” and “Settings – Configuration”.
Invoice statuses are:
- Confirmed – invoice has a file and it has been confirmed by the verifier
- Not confirmed – there might be a file, but it’s not confirmed yet or the file is missing (not added)
- Locked – If the invoice is locked, then you can’t do any further operations with that invoice. If you want to change something then you have to change the status.
- Confirmed and payment sent to bank – a file has been added and the payment file has been made.
You can add the status when you make a new invoice (“Purchases” > “Purchase invoice (add new)“ > “Purchase invoice”. You can add/change the status in the left menu, in the last cell. When you want to change the status on the existing invoice, then go to “Purchases” > “Open Payables” > “Purchase invoices”. You will see a list of invoices. Open the needed invoice and change the status (left menu, last cell). You can also search by the status. That gives you an overview of invoices that needs further work.
You can also see the changes of the status:
- Open the invoice and click on the button “Other” > “Invoice approval”.
- You can see the approval in purchase inbox (choose the status or click on the “i” logo)
Invoice confirmation statuses:
- Rejected – not confirmed
- Approved – saved to the invoice
Person who can confirm invoices can do the following:
- Create invoices if he/she has the privilege
- Confirm/reject the created invoices
- Confirm/reject the files
Person who don’t have rights to confirm invoices:
- Can save the invoice with “not confirmed” status
- Can save files
- Can’t confirm invoices
- Can only add the status “Not Confirmed” to the invoice – system determines if invoice is approved or leaves the status “Not confirmed”.
You can find further information about invoice approval from the following video:
FAQ
How can I make invoice confirmation with two approvers?
Open “Settings” > “Configuration”. Go to the chapter “Invoice approval rules” and add the number of approvers.
How can I determine that person X must be the main approver?
Go to “Settings” > “Configuration > chapter “Invoice approval rules”.
Can I confirm many invoices at once?
Yes. Open the purchase invoices, choose the status “Not confirmed”. Choose the invoices that you want to confirm and click on the button “Confirm”.
Can I remove the confirmation on confirmed files?
Yes, open the purchase invoices. Open the invoice and change the status in the left menu.
Where can I see all the not confirmed invoices?
Open the purchase invoices, choose the status “not confirmed” and you will see a list on not confirmed invoices.
Where can I see all the not confirmed files?
Open the purchase inbox (“Purchases” > “Purchase inbox”). Choose the status not confirmed and you will see a list of not confirmed files.
Can you give previous information for the accountant before compiling the invoice?
Yes, you can do that while you compile invoice in Purchase Inbox.
Where can I see the confirmation history?
Open the report generator (“Reports” > “Report generator”). In Tables choose “Invoice Approval” and “Invoices” and in output choose “Invoice Approval.Creator ID”, “Invoices.Invoice.no”.
Where can I see all the confirmations?
Go to “Reports” > “Report generator”. In tables choose “Invoices”, “Invoice approval”. In output choose “Invoices.Invoice No.”, “Invoices Status”. Add one parameter (click on the “Add” button”). Parameter – “Invoice Approval. Status”, type – “Equals”, value – “Confirmed”.
Where can I see files that are “Confirmed” but have not yet been made to invoice?
Open the purchase inbox module. Search the status “pending”. You will see all the confirmed files.
Can I see the information that will display in the email and where can I see information about confirmations?
Yes, open the purchase inbox module. In the left side of the screen are files. Go on the file row (the file what for you asked the confirmation) and click on the “i”, that’s the last button on the row. If files are confirmed, then the “i” button turns into a green “tick”.
If you click on the “i” button, you can see the file’s name, status, who sent out the email and who confirmed it.