Managing custom fields
What are custom fields and why do we need them?
We have designed custom fields in order to add extra information to various modules in ERPLY Books. A custom field could be a simple text box in a Sales or Purchase invoice or an additional drop-down menu in another module. Generally, custom fields are cells to enter additional information.
Where can you add them and in what modules can you use them?
In order to add a custom field, go to Settings > Configuration > Additional attributes for modules > Manage.
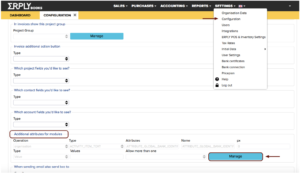
Custom fields may be added in 5 modules in ERPLY Books: Contacts (customer/vendor card), Employees (employee card), Articles (article sheet), Invoice (bottom left corner) and Organisation (Settings>Organisation Data). Use Operation column to choose the desired module.

How to add and use custom fields?
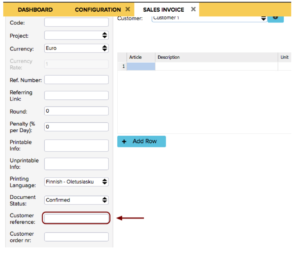
Custom fields come in handy when you need to put additional data on your invoice or in other modules in ERPLY Books. E.g. local authorities require additional data like Customer Reference number (the example of Finland).
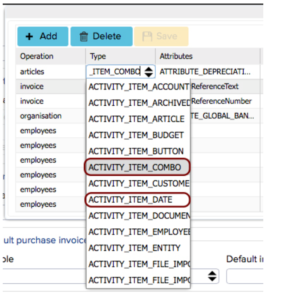
A simple example of using custom fields for internal needs is adding your employees’ family members’ names, their birthdays and gender.. Go to Settings > Configuration > Additional attributes in modules > Manage.
In Type you choose the type of a box you want to add. Mostly used types are Text (ACTIVITY_ITEM_TEXT), Multiple choice box or such called Combobox (ACTIVITY_ITEM_COMBO), Date (ACTIVITY_ITEM_DATE). However, there are plenty of other options to choose from.
-Attributes is the subsection in a certain module, where the entered additional information is displayed. Here you should enter plain text. In order to avoid mistakes, it is preferable to name the subsection in a way that it doesn’t include any spaces. However, the software still allows spaces. One-word name is the most preferable. We have marked preferable value entry examples in red.
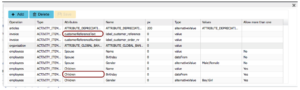
-Name is the name of the box.
-Type is the sort of value that you want to see in a particular box.
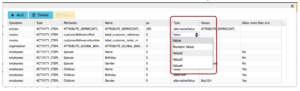
-Values is where you enter values for the Combobox. The values are separated by |, there should be no spaces between values. E.g. Boy|Girl.

-Allow more than one lets you add more than one data box. E.g. if you have multiple children, by choosing Allow more than one > Yes, you’ll be able to add multiple Name boxes in the module.
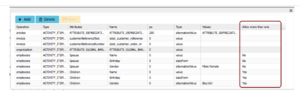
This is the example of how you should add attributes in order to have the necessary data in your Employee card. In western cultures you can only have one spouse, that is why Allow more than one is set at No for this subsection.
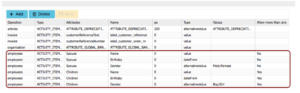
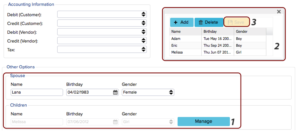
Having multiple children is more likely, that is why Allow more than one is set at Yes for this subsection. This means that after adding these attributes the user will be able to add children to their employee cards right inside that particular module.
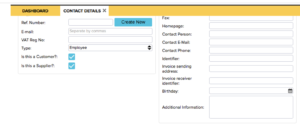
This is how additional attributes are added to the employee cards.In order to manage the employee’s children, click Manage > Add > enter all necessary data > Save.
In case you require assistance in managing custom fields for your organisation, do not hesitate to contact us.