Automatic email notifications
In ERPLY Books, it is also possible to set up automatic notifications that are sent to specified email addresses. Examples of cases in which this may be necessary:
- You would like to email a sales by customers report once a month to the company’s manager.
- You want to receive a specific notification (for example, receive an email if the sales invoice you made exceeds the deadline by 3 days or, for example, receive a reminder if you have not confirmed the invoice within three days after receiving the request)
To set this up, write “Manage notifications” in the search field on the main page, and then the following will open: 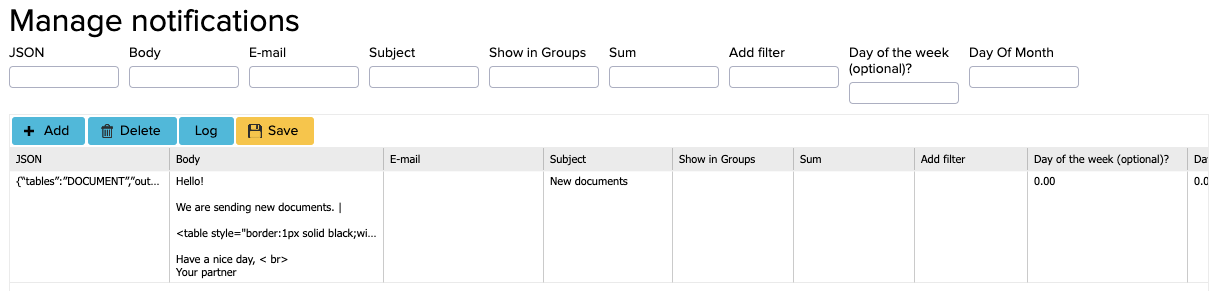
Setting up columns
Now the following rules must be added:
- JSON: {“tables”:”DOCUMENT”,”output”:”DOCUMENT.DATETIME|DOCUMENT.NUMBER|DOCUMENT.SUM_NO_VAT”,”groupBy”:””,”parameters”:[{“rules”:[{“tableName “:”DOCUMENT”,”fieldName”:”CREATE_DATETIME”,”referenceType”:”MORE_THAN”,”value”:”2022-09-30T21:00:00.000Z”,”filterName“:”first”}],” index”:0}]}
- Body: Must be written as HTML, described below
- Email: where the notification is sent
- Subject: the email’s subject
- Show in groups: setting this up is necessary if you want the sent emails to be different and grouped by a certain characteristic
For example, if you want to send an email to all vendors, then all vendors are searched for at the same time. If you determined with a rule that the groupValue is the registration code, then the email is sent to all vendors separately.
- Sum: You can add an amount that will be added to the end of the email
- Add filter: for example first=DATE_MINUS3 (explanation below)
Finally, save the changes, log out of the account and back in for the changes to apply.
Setting Up Reports Directly via PDF URL
You can set up reports using the PDF URL of the desired report.
- Adding the URL: The PDF URL must be added instead of JSON. For example:
Replace
{organisation_id}with your organization ID and select appropriate dates as described below. - Setting Dates: The URL must specify date values. For example:
- LAST_MONTH_BEGINNING: beginning of the previous month
- LAST_MONTH_END: end of the previous month
You can choose from the following values:
- LAST_YEAR_BEGINNING
- LAST_YEAR_QUARTER_BEGINNING
- THIS_QUARTER_BEGINNING
- THIS_YEAR_BEGINNING
- LAST_MONTH_BEGINNING
- THIS_MONTH_BEGINNING
- LAST_YEAR_END
- LAST_YEAR_QUARTER_END
- THIS_QUARTER_END
- THIS_YEAR_END
- LAST_MONTH_END
- THIS_MONTH_END
- Email Setup: For example, if you want to send a report to the company manager on the 25th of each month, whose email address is specified, set the reporting period to the beginning and end of the previous month.
- Sending Multiple Reports: If multiple reports are generated on the 25th, where the email subject and recipient are the same, all files will be sent in a single email.

Describing HTML
HTML consists of different parts that are joined together later. | is used as a delimiter. In general, the HTML would look something like this: Add introductory text here|FIRST:ENTITY.BILLING_NAME|<table style=”border:1px solid black;width:100%;border-collapse:collapse”><tbody><tr><th>Department</th><th >Article</th><th>Quantity</th></tr>|ALL:PROJECT.NAME,ARTICLE.NAME,ARTICLE_ROW.QUANTITY|</tbody></table>|SUM:Total:|End of email here
HTML parts
Let’s describe the parts of the HTML:
- FIRST:BooksContactName – retrieves BooksContactName from the first object on the list.
For example, you are sending quantity comparison balances to vendors and you want to enter the vendor’s name: <table style=”border:1px solid black;width:100%;border-collapse: collapse”><tbody><tr><th>Column 1 Name</th ><th>Column 2 name</th><th>Column 3 name</th></tr> – this is the table style and headers.
- ALL:BooksWarehouse,categoryName,purchasedQuantity – ALL means that all rows will be added in the table
As a style, add the usual <td style=”text-align:right;border:1px solid black;border-collapse: collapse”> </tbody></table> – this is the end of the table
- SUM:Total: – if you have set a summing value, after the value of “SUM:” the system will add what is written there and the number summed accordingly, the given amount is not rounded. For example, if the amount was 2482.00, the value will be “Total: 2482.00”.
As a more specific example, here is the HTML description in case you want to send a table to a customer. Below you can see the sales documents’ numbers, dates and amounts. The HTML should be composed as follows: Hello!<br><br>We are sending new documents. |<br><br><table style=”border:1px solid black;width:100%;border-collapse: collapse”><tbody><tr><th>Nr</th><th>Kp</ th><th>Sum</th></tr>|ALL:DOCUMENT.NUMBER,DOCUMENT.DATETIME,DOCUMENT.SUM_NO_VAT|</tbody></table>|<br><br>Have a nice day, < br><br>Your partner In an email it would look like this: Hello We are sending new documents.
| Document number | Date | Amount |
Total: 8482.00 We wish you a nice day, Your partner
How to set up the “Add filter” column?
Since the content of the email and the table are created based on the filters that are set up in the Report Generator, the filters which the system needs to change must be set to filterName according to the rules. Through this, the system will know which filter to change. Let’s say you want to search for new contracts. In this case, there need to be at least two filters in the Report Generator:
- Type = contract
- Creation date = later than or equal to today’s date.
Here, don’t change the Type filter, but the date in the system needs to be set for today. Filters that can be changed: MONTH, YEAR and DAY are for indices where the value is month, year or day:
1. Dates
- DATE – for those where there is a date change
These return the full date as a string in the format set in the system (e.g., dd.MM.yyyy or yyyy-MM-dd).
- CURRENT_DATE – returns the current date (e.g., 06.02.2026 or 2026-02-06).
Dates can also be added or subtracted. To do this, append _PLUS<n> (for addition) or _MINUS<n> (for subtraction) to DATE. Examples:
- DATE_PLUS1 – adds one day (06.02.2026 → 07.02.2026)
- DATE_MINUS10 – returns the date 10 days ago
It is also possible to return the first or last day of a month.
- MONTH_BEGINNING<n> – returns the first day of the month that is n months ago
- MONTH_BEGINNING1 → returns the first day of the previous month
- MONTH_END<n> – returns the last day of the month that is n months ago
- MONTH_END0 → returns the last day of the current month
It is also possible to subtract hours if needed (MINUS_HOURS<n>), which subtracts n hours from the current time. If enough hours are subtracted to cross midnight, the date will also change. Examples:
- MINUS_HOURS2 – subtracts 2 hours (2026-02-06 01:00 → 2026-02-05)
2. Numbers
- CURRENT_MONTH, CURRENT_YEAR ja CURRENT_DAY – these values indicate the current month, year, or day (when no plus or minus is added).
As with dates, numbers can also be added or subtracted (for example, moving several days/months/years forward or backward). To do this, append _PLUS<n> (addition) or _MINUS<n> (subtraction) to MONTH, YEAR ja DAY. Examples:
- DAY_PLUS7 – võtab päeva nädala aja pärast
- MONTH_MINUS2 – võtab üleeelmise kuu
Exception:
- If CURRENT_YEAR and MONTH_MINUS are specified and the month is 12, the year is taken as -1 because MONTH_MINUS says to go back some months. So when December of the previous year came up, the year must also change.
- Similarly, if there are CURRENT_YEAR and MONTH_PLUS and the value of the month becomes +1, then the year changes accordingly.
Using filtername directly in the Report Generator
In addition, filterName can be used directly in the Report Generator, not just in notification management. To do this, open the Report Generator (Reports → Report Generator) and click the button: Other options.

After that, the 4th field in the filters will appear (a filter must be added beforehand) called: Name.
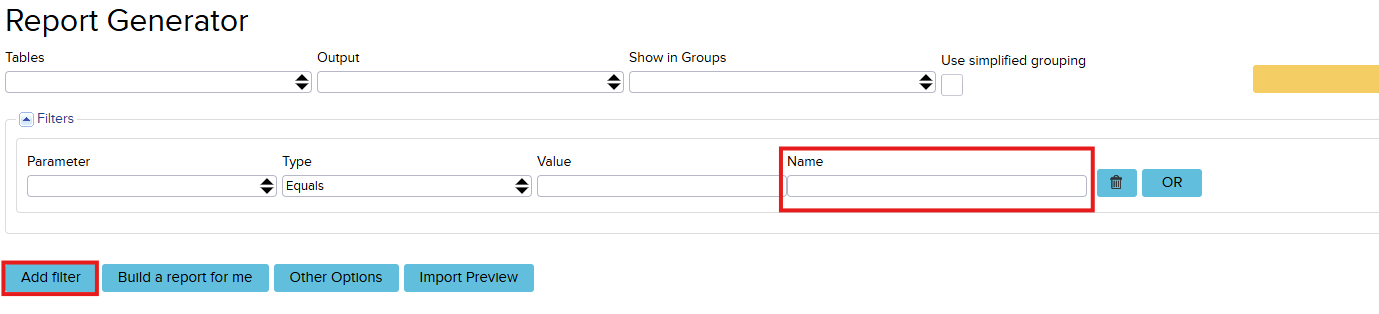
Example
In this example, the goal is to find all Transactions’ IDs (Transactions.ID) for the current month in the Report Generator. To solve this, two filters must be added to define the correct date range.
In this specific example, it was necessary to retrieve all Transaction IDs for February. However, after a month, these date filters would become incorrect and the date fields would need to be updated to March. To automate this process, the 4th field can be used, where MONTH_BEGINNING0 and MONTH_END0 are added. By using these, there is no longer a need to manually update the date fields, as the correct month will be selected automatically.
