Account mapping
Account mapping explains account hierarchy in ERPLY Books. E.g. accounts with number 6 are more important than accounts with number 7 etc. It means that we can use account rules for some exceptions. Account mapping is an guide for explaining what rules you can apply to automatically select accounts.
Account Hierarchy
See the account mapping PDF file here: ERPLY Books Account Mapping
Account mapping is normally used with ERPLY Books on its own. Although, there are some account mapping rules that may only be used in ERPLY Inventory software and ERPLY Books together. Below you will find the overview of the concept and the explanation of how it operates.
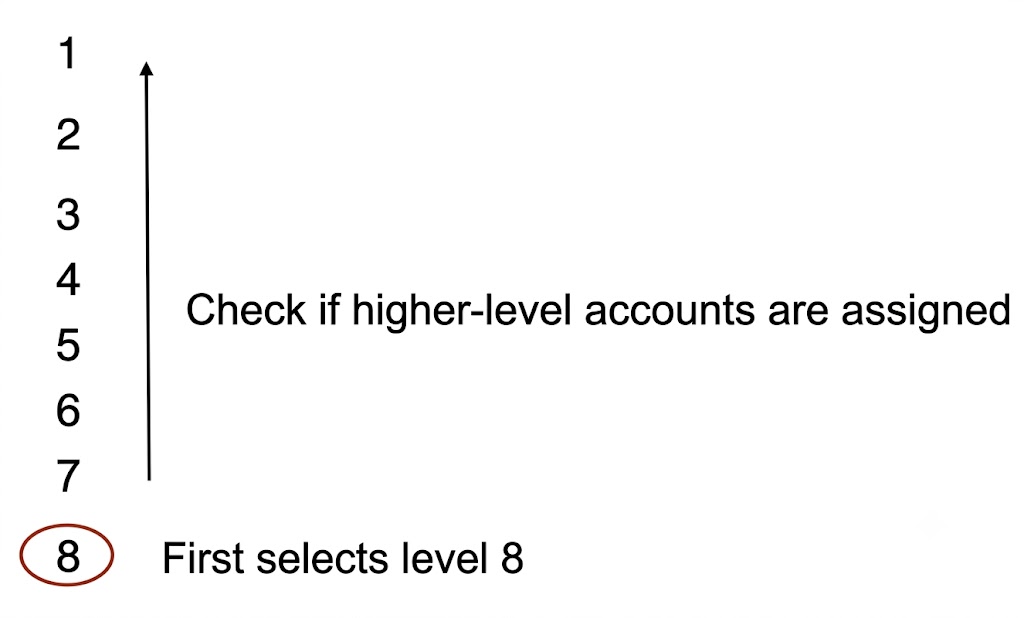
There are 8 hierarchy levels in account mapping. The PDF instruction attached above shows the hierarchy levels and explains how to add the rules. The system chooses the Level 8 account by default, unless the user has added an additional rule that overrides the initial setup. Level 1 accounts have the highest priority, i.e. in case a Level 1 account rule is set, it will automatically override other rules in the system. In case Level 1 rule is not set, the priority will be given to the Level 2 rule, and so on till the Level 8 rule, which is set by default.
Overall there are 13 account types, all of them have at least 2 levels of hierarchy. If there is more than one rule for the same hierarchy level, the user can only set one of them, which means that it is not possible to use two and more rules from the same hierarchy level in your setup. Most companies do not have rules set higher than Level 5, which is explained by the absence of multiple locations, tax rates or specific partners that require additional setup.
For many account types, the Custom account mapping is used at level 1 (“Settings” > “Configuration” > “Custom account mapping”), which replaces Account (1) with Account (2). The replacement only takes effect when all conditions are met: Type, Account (1) and (2) are defined. To narrow down the account replacement, it is possible to filter by Customer/Supplier and/or Project(s).
- Type — each account type has its own specific value (see the PDF for more details)
- Account (1) — the account to be replaced
- Account (2) — the account that replaces Account (1)
- Project — filters by a specific project (dimension)
- Customer / Supplier — filters by Customer or Supplier
- Project2 — filters by a second dimension, allowing an additional dimension filter to be applied

In this manual we will review the account mapping setup based on example of the Sales Invoice Revenue Accounts.
Sales Invoice Revenue Accounts setup
For this example we chose this type of accounts because it has the most hierarchy level and will explain the account mapping principles more thoroughly.
Let’s start from Level 8 – System account: Primary Income. In order to assign a Sales Invoice revenue account, go to “Settings” > “Initial Data” > “System Accounts” > “+” > then choose the account.
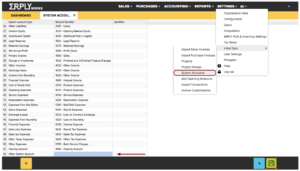
In case you need to create a new separate account, go to “Accounting” > “Chart of Accounts” > “+” > add an account with desired features.
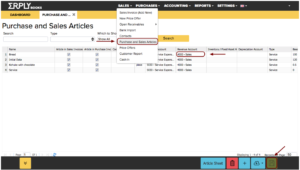
Level 7 – Article Revenue Account. Go to: “Sales” or “Purchases” > “Purchase and Sales Articles” > add the revenue account from your account list.
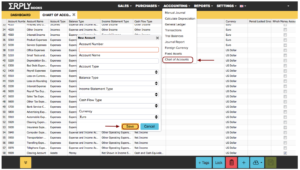
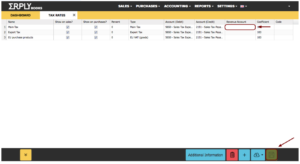
Level 6 – Tax Rate Revenue Account. Go to: “Settings” > “Tax rates” > add revenue account from your account list.
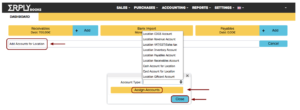
Level 5 – Location Revenue Account. Type into search box: “Add Accounts for Location” > choose the account type > “Assign Accounts”.
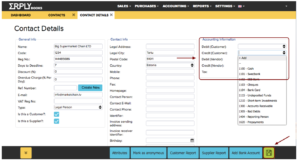
Level 4 – Customer Credit Account. Go to “Sales” > “Contacts” > find customer > add credit account.
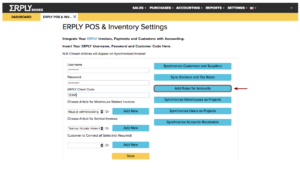
Level 3 – Product Group Revenue Account or Customer Group Revenue Account. This feature is only used together with ERPLY Back office. Go to “Settings” >” ERPLY POS & Inventory Setting” > add rules for Accounts.
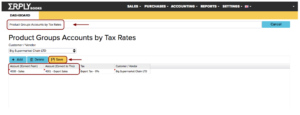
Level 2 – Product Group Tax Rate Revenue Account. Type into search box: “Product Groups Accounts by Tax Rates” > add revenue account into Account (Convert to this) column.
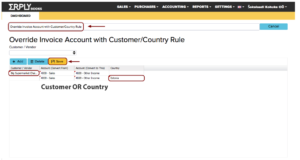
Override others – with customer or Override others – with country code. Type into search box: “Override Invoice Account with Customer/Country Rule” > “+Add” > enter a customer or a country name > choose account to convert from and to. E.g. your sales in Tallinn go to a specific account (4000 – Sales). In case you sell from Tallinn to a Finnish customer, you can choose another account to allocate these sales (4010 – Sales Finland). The same principle applies to a specific customer.
Level 1 – Custom account mapping. Go to “Settings” > “Configuration” > Custom account mapping. Click “Manage” > “+ Add“, choose “Type”: FEATURED_ERPLY_PAYABLES_PROJECT, Select Account (2), which will replace Account (1), Project and other conditions.
