Quickbooks Connector
Quickbooks integration is a paid service. Please write to support@erplybooks.com to ask us to make you an offer.
The connector tool is used for syncing sales, purchases and payment transactions from ERPLY Books to QuickBooks. The connector tool is also used to sync all ERPLY POS & inventory transactions with QuickBooks (ERPLY POS -> ERPLY Books -> QuickBooks)
You can make the initial settings according to this manual and if assistance is needed with synchronization, ERPLY Books can be contacted to assist (support@erplybooks.com)
The following steps need to be followed:
- Set up and ERPLY POS account
- Set up an ERPLY Books account
- ERPLY Books synchronizes transactions from ERPLY POS to ERPLY Books
- ERPLY Books maps all transactions to the correct bookkeeping accounts
- Select the period you would like to send data to QuickBooks
- Send sales invoices, purchase invoices and payments to QuickBooks separately or as a whole
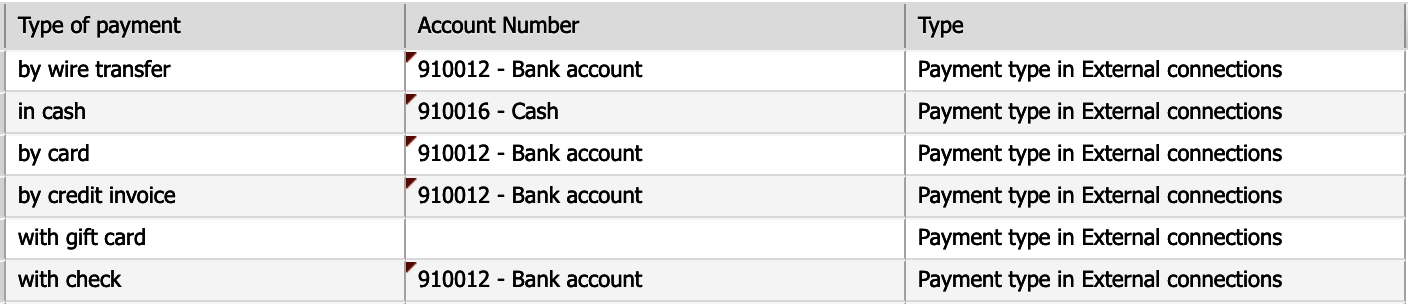
| ERPLY Books syncs the following items FROM QuickBooks: | ERPLY Books syncs the following items TO QuickBooks: |
|
|
Creating account in ERPLY POS
Create an account here.
Creating account in ERPLY Books
Create an account here.
If you have created the account with the incorrect currency, click on the company name, select “Add new organisation”. You can now add the organisation with the correct currency and language.
Setting up Quickbooks Connector
1. Go to “Settings” > “Configuration”, tick “Use external system connections?” and click the “Save” button. This option allows you to see which transactions have been synced to QuickBooks and which have not.
2. In the Dashboard search for “Global Parameters” in the search box. In the next module add the following row:
Name: GLOBAL_SHOW_PARTNER_TAX_CONNECTOR , Value= true
Click “Save”, then logout and login again.
3. Open “Settings” > “Integrations” and click the “Synchronize” button.

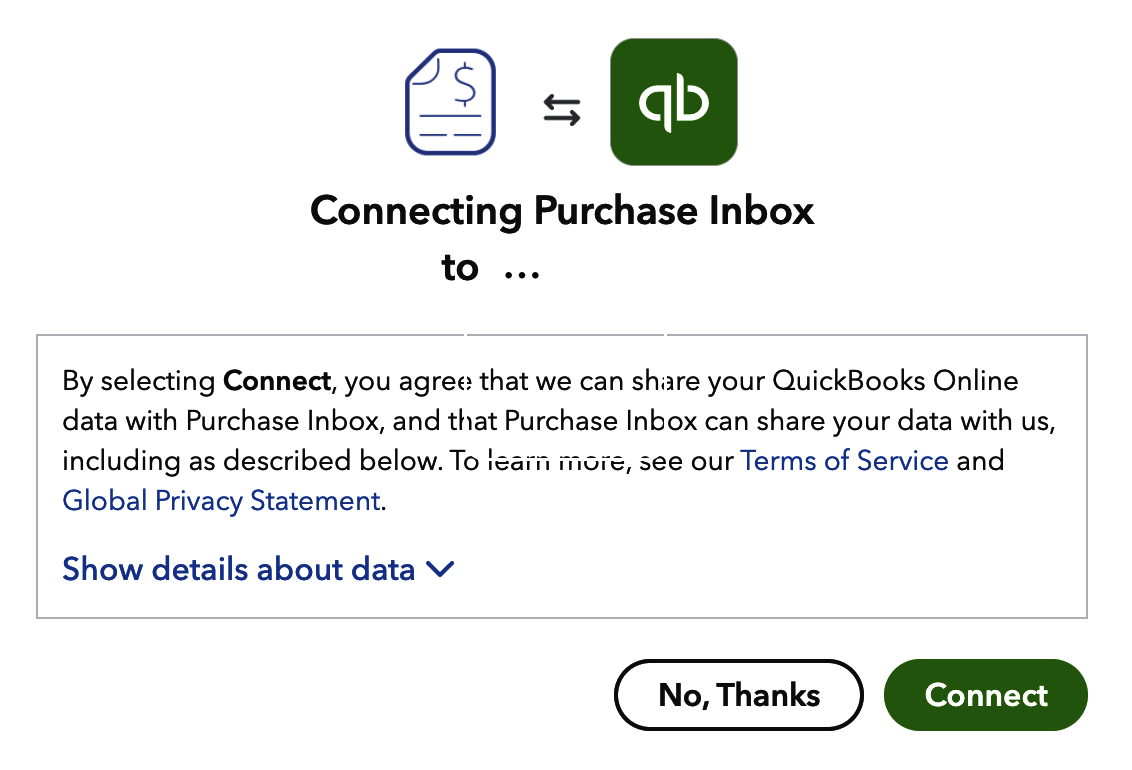
4. Click the “Authenticate with QuickBooks” button.
![]()
When the loading process is done, click “Leave” to leave the site.

5. Choose the QuickBooks organization with which you want ERPLY Books to be linked and click “Connect”.
Setting up QuickBooks Module
After you have set up the connector you will have access to the QuickBooks module in ERPLY Books.
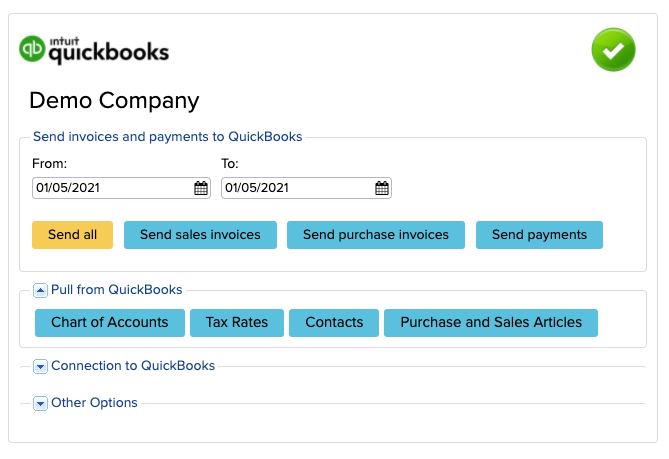
Next, you can do the following:
- Select “Pull from QuickBooks” and click on the following buttons:
- “Chart of Accounts” – pulls through all accounts from QuickBooks into ERPLY Books. These accounts are now active in ERPLY Books. Any accounts that existed in ERPLY Books before the sync are not deleted, they are marked as “not active”. All accounts can be seen by clicking on “Accounting” > “Chart of Accounts”.

- “Tax Rates” – pulls through all tax rates from QuickBooks into ERPLY Books. All tax rates can be seen by clicking on “Settings” > “Tax rates”. Ensure that one of the tax rates have type “Main tax”. Quickbooks tax rates have “Quickbooks” in the connections column. Now link other tax rates (which have been created in ERPLY POS or ERPLY Books) with QuickBooks tax rates by selecting Quickbooks tax rates in the following columns: “Show on sales?” and “Show on purchases?”. Then click “Save”.

- “Contacts” – pulls through all contacts from QuickBooks into ERPLY Books.
- “Purchase and Sales Articles” – not recommended.
- “Chart of Accounts” – pulls through all accounts from QuickBooks into ERPLY Books. These accounts are now active in ERPLY Books. Any accounts that existed in ERPLY Books before the sync are not deleted, they are marked as “not active”. All accounts can be seen by clicking on “Accounting” > “Chart of Accounts”.
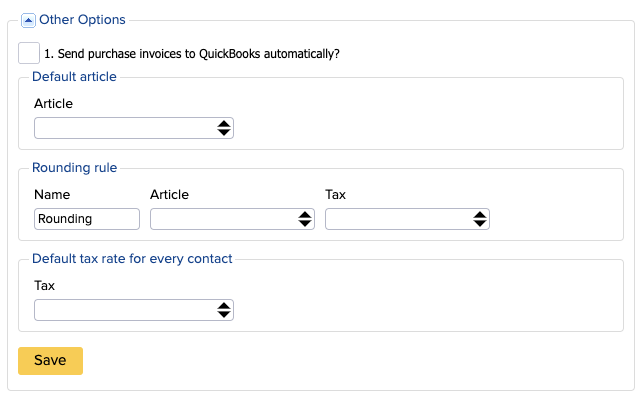
- 2. By selecting “Other options” you can choose the following:
- “Send purchase invoices to QuickBooks automatically” (optional)
- “Default Article” (optional). All invoices with one article can be sent to QuickBooks.
- “Rounding rule”(mandatory). This option is important for rounding. A new row is created for rounding with a specific name, article and tax rate.
- “Default tax rate for every contact”(optional). All invoices with one tax rate can be sent to QuickBooks.
Bookkeeping accounts
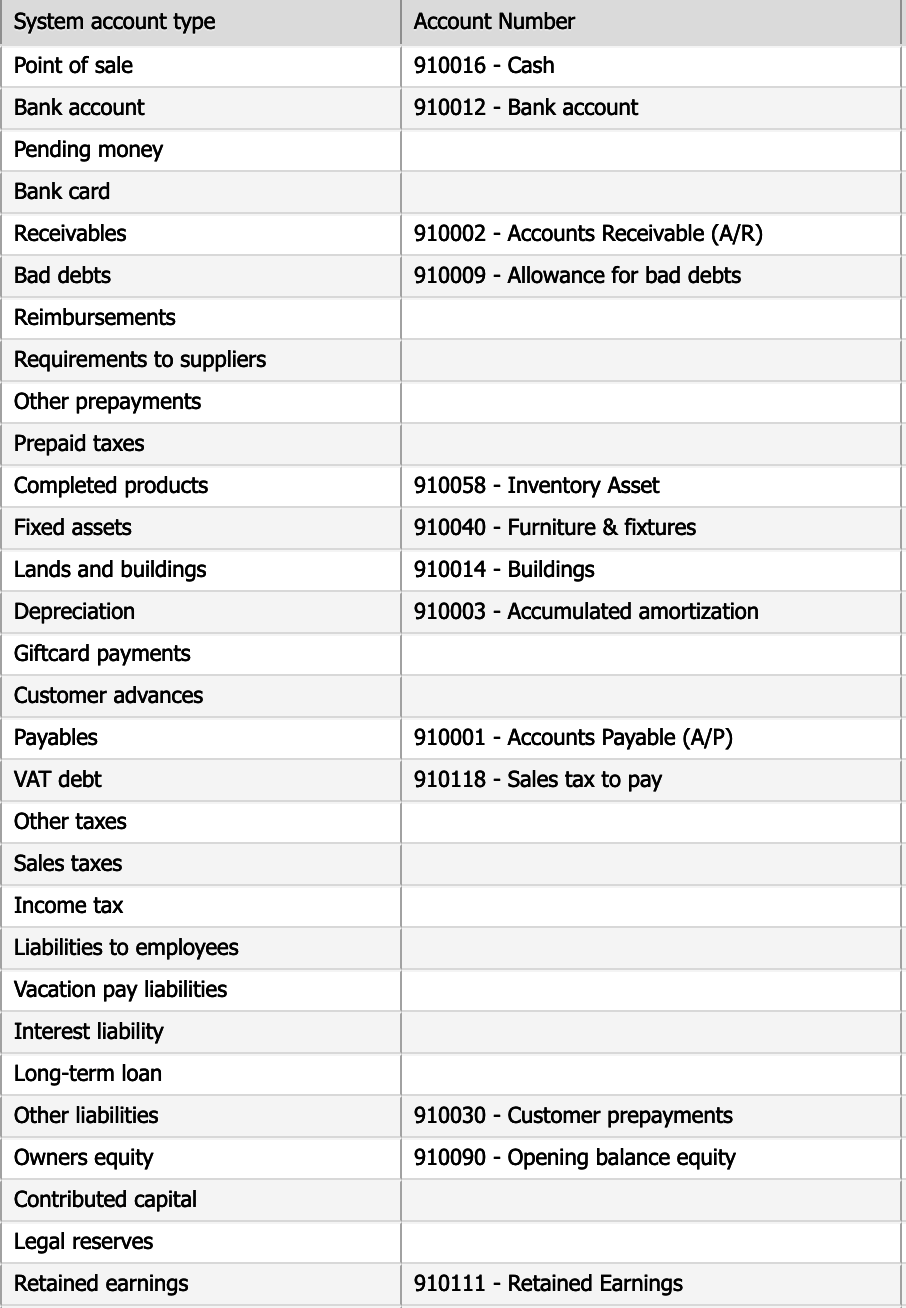
1. System accounts
- Go to “Settings” > “Initial Data” > “System Accounts”.It is important to check whether all system account types that you need for synchronizing, have a corresponding QuickBooks account next to it.
- The following account types are usually required:
- Point of sale
- Bank account
- Bank card
- Receivables
- Requirements to suppliers (supplier prepayments)
- Completed products (inventory account)
- Payables
- VAT debt
- Primary income
- Cost of goods sold
- Service expenses
Make sure that all transaction types you need for syncing have QuickBooks accounts next to them. If the account does not exist in ERPLY Books then the account needs to be created in QuickBooks and the accounts import needs to be done again. It is important to only use accounts which are imported from QuickBooks if you want to synchronize data from ERPLY Books to QuickBooks. (Do not create new accounts in ERPLY Books because these transactions can not be imported to QuickBooks)
2. Tax accounts
Go to “Settings” > “Tax rates” and change the tax accounts.

3. Purchase and Sales articles accounts
- Open “Sales” > “Purchase and Sales articles” and choose the accounts for product and service articles (“Completed products” and “Services”) which you use when syncing from ERPLY POS. Then “Save”.
4. ERPLY POS payment accounts
Go to“Settings” > “ERPLY POS & Inventory settings” and click “Add Rules for Accounts” and make sure all payments and invoices go to the correct accounts.
- The following account types are usually required:
Roundings in ERPLY Books vs QuickBooks
In QuickBooks all rounding is done in 2 decimals, however in ERPLY Books it depends on the rules that were set up. In QuickBooks there is no option to round invoices and rounding needs to be added as a separate invoice row. If you want ERPLY Books to do the same, then you need to add a rounding rule. Under the QuickBooks sync module you can add this by going to “Other options” > “Rounding”.

- In the Dashboard search for “Global Parameters” in the search box. In the next module add the following 2 rows:
- Name: GLOBAL_PARTNER_ROUNDING_RULE , Value: rounding
- Name: ATTRIBUTE_ERPLY_SYNC_ROUND_TOTAL , Value: true
Click “Save” and logout/login.
Everyday process
- ERPLY Books takes invoices and payments from ERPLY POS and sends them with the same information to QuickBooks. If a document is correctly synced from ERPLY POS, it will be synced to QuickBooks with the same information.
- First you can sync with ERPLY POS
- Thereafter you can sync with QuickBooks
- For QuickBooks synchronization go to “Settings” > “Integrations” > click on “Synchronize” (QuickBooks).
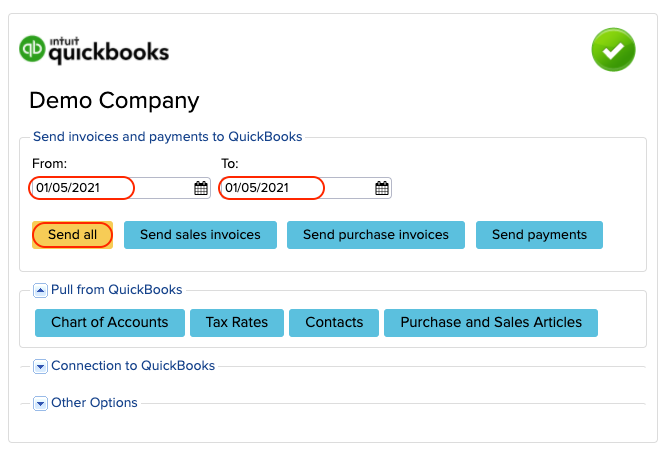
- Choose the period.
- Click “Send all” to send all invoices and payments to QuickBooks. You can also choose to only send one of the following: “Send sales invoices”, “Send Purchase invoices” or “Send Payments”
- If everything was set up correctly then the data is synchronised from ERPLY Books to QuickBooks and a “QuickBooks” note will appear in the “Connections” column. The software will be display an error message if the set up was not correct.
Limitations
- You can not create the same accounts manually in ERPLY Books and QuickBooks although they have the same account numbers they still have different id numbers, therefore the system does not recognise them. All new accounts must be created in QuickBooks and then be pulled through to ERPLY Books.
- After syncing data from ERPLY Books to QuickBooks the transactions will be locked in ERPLY Books. This prevents multiple data transmissions.
- Once you have sent invoices to QuickBooks you can not send the same invoices again. These will not be overwritten in QuickBooks. You first need to delete previous invoices or payments, then only can you send them to QuickBooks.
- It’s not recommended to pull through articles from ERPLY Books to QuickBooks as the system cannot send stock items to QuickBooks.
- For QuickBooks synchronization go to “Settings” > “Integrations” > click on “Synchronize” (QuickBooks).