
Dimensions from ERPLY Inventory
All objects, projects, departments, or other entities that you need to use for filtering reports are referred to as dimensions. In ERPLY Books, dimensions are managed through Projects and Project Groups.This allows you to analyze and filter reports by different projects and project groups. You can read more about Projects here and Project Groups here.
All transactions synchronized from ERPLY Inventory can be automatically assigned to the correct dimensions in ERPLY Books. There are several ways to achieve this.
ERPLY POS & Inventory Settings
If you use multiple warehouses, employees, or POS registers in ERPLY, you can reflect the related transactions in ERPLY Books through different Projects. To do this, synchronize warehouses, employees, or POS registers as projects in ERPLY Books. Afterward, transactions will automatically be assigned to the corresponding projects during synchronization.
| ERPLY | BOOKS |
| WAREHOUSES | PROJECTS |
| EMPLOYEES | PROJECTS |
| POS | PROJECTS |
To synchronize warehouses, employees, or POS registers as projects, open: “Settings” > “ERPLY POS & Inventory Settings”
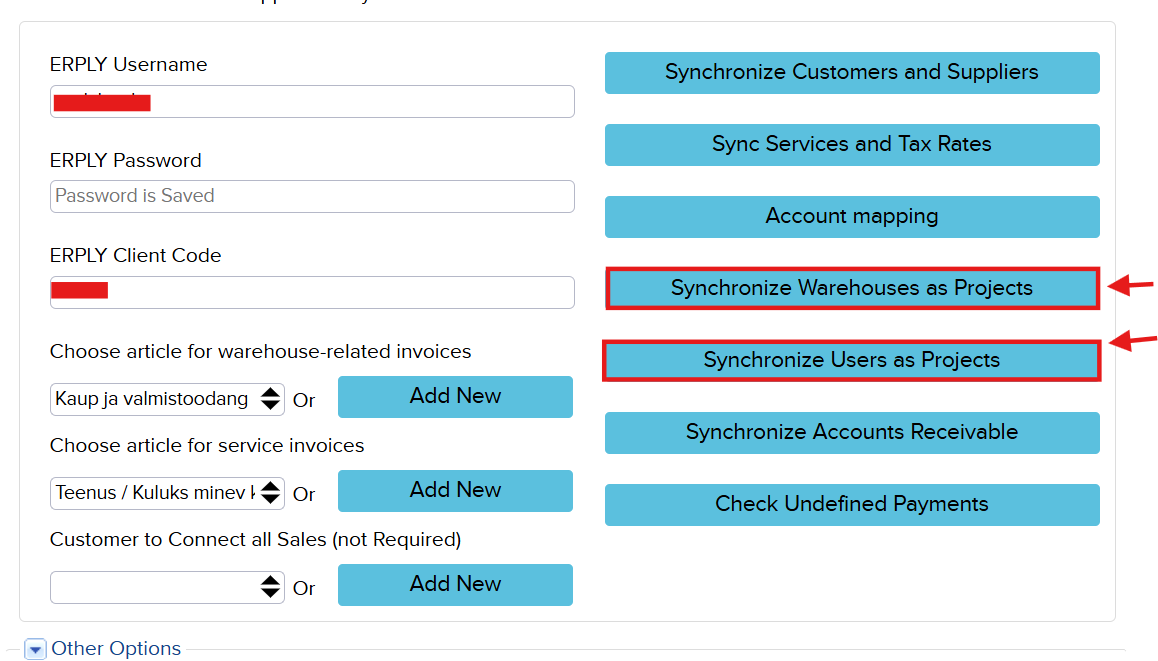
1. Synchronize Warehouses as Projects –Use this option if sales are carried out from multiple locations and each location has a separate warehouse in ERPLY. Once enabled, all synchronized transactions will automatically be assigned to the corresponding projects in ERPLY Books.
For example, if you have a Tallinn Warehouse and a Tartu Warehouse, transactions from these warehouses can be recorded under the Tallinn and Tartu projects in ERPLY Books. This also allows you to analyze reports separately for each location.
If you want all newly created warehouses to be automatically synchronized as dimensions as well, enable Rule No. 3 – “Synchronize Locations Automatically?” under Other Options.

2. Synchronize Users as Projects – use this option if sales take place at one or multiple locations, but separate warehouses are not used for each location in ERPLY.
This can be useful, for example, if you want to track which employee created a sales document in ERPLY and have the transaction reflected in that employee’s reports. It is also useful when employee bonuses or commissions are calculated based on sales performance. Once enabled, all transactions will be synchronized to ERPLY Books and assigned to projects based on the corresponding employee. This makes it possible to distinguish and analyze transactions by employee or location.
If you want newly added employees to be automatically synchronized as dimensions as well, enable Rule No. 6 – “Synchronize Users into Projects Automatically?” under Other Options.

3. Synchronize POS names as Projects – if you use multiple POS registers, enable Rule No. 28 – “Sync POS names as projects?” to synchronize them separately. This is useful, for example, when a single store operates multiple POS registers. When a new POS register is added in ERPLY, ERPLY Books will automatically create a corresponding project for it.

The rules “Synchronize Users as Projects” and “Synchronize Users into Projects Automatically?” also automatically add employees to the Contacts module.
If you are using the Projects module in ERPLY Inventory (this module is not enabled by default for organizations), you should enable Rule No. 7 – “Synchronize Custom Projects Automatically?” under Other Options. This ensures that any new projects created in ERPLY Inventory are automatically synchronized to ERPLY Books.

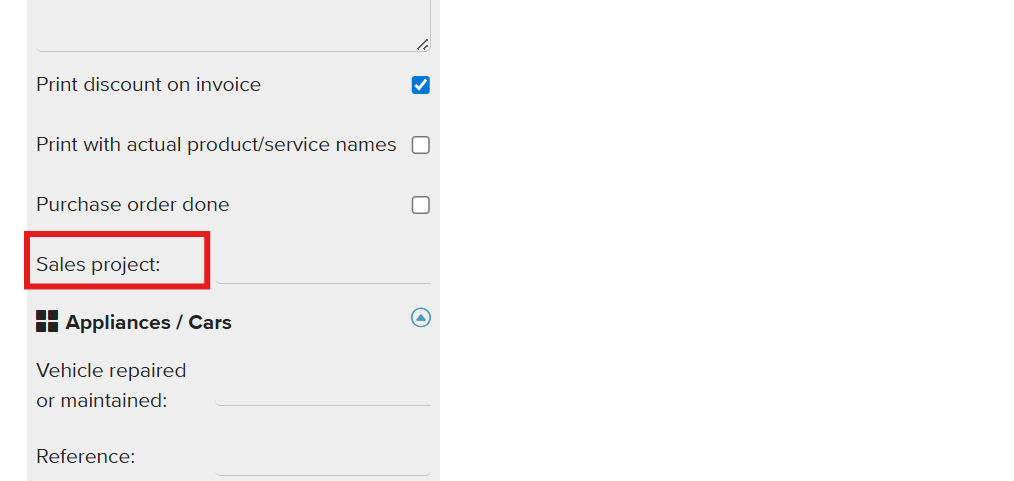
The image below shows how the Projects module can be used in ERPLY Inventory. Once enabled, Projects can be selected from the Settings > Projects and a Projects can also be assigned directly on a document using the menu on the left side of the screen.
Customer project setting
If you want each customer to be automatically created as a separate project, this can be configured under Customer project settings. To enable this functionality, set the “Enable” field to “Yes”.

1. Within this configuration, customers can first be grouped and filtered based on their Code. For example, if a specific code represents a particular customer group and you want to analyze the performance of that group, set the “Code” field to “Yes”.
It is also possible to use the integration code as the customer code. To do this, enable Rule No. 32 – “Customer sync: code as integration code?”. When this rule is enabled, the customer code in ERPLY Books will be populated with the integration code defined in ERPLY Inventory. This can be useful for identifying which transactions are related to specific business partners.
2. Another option is to group customers based on their registration number. For example, if you have multiple customer records belonging to the same company (such as several stores within the same chain), you may not want to analyze each customer separately. Instead, you can use the registration code to create a single dimension for that company and analyze its overall profitability. Using dimensions is particularly useful because costs can also be allocated to them, allowing for more accurate profitability reporting.
- The Code and Registration Number options are mutually exclusive. If you set both fields to “Yes”, the rule will not work because ERPLY Books will not know which value should be used for creating the dimension.
3. Project Group setting determines which project group the customer belongs to.
4. Customer manager – when this option is enabled, ERPLY Books imports the customer manager information from ERPLY. This can be useful when it is important to track who created the invoice or who is responsible for managing the customer relationship. Once enabled, customers will be synchronized and linked to their respective customer managers. For example, if a particular customer manager is responsible for 20 customers, reports can be generated for that customer manager, showing all transactions related to those customers. This makes it easy to analyze sales performance and profitability by customermanager.
ERPLY Synchronization Parameters
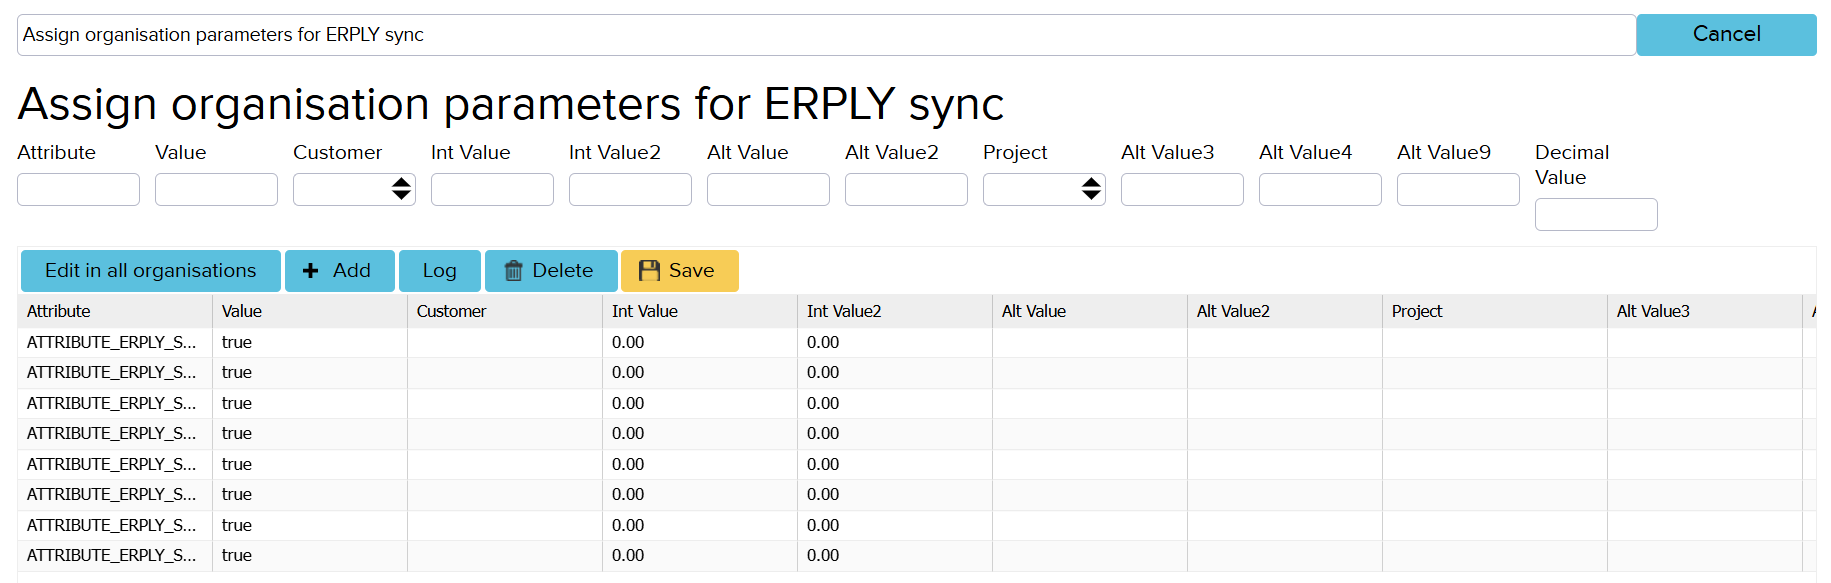
Next, let’s look at the available synchronization settings under ERPLY Sync Parameters. You can access these settings by searching for “Assign organisation parameters for ERPLY sync” in the search box on the ERPLY Books dashboard.
Updating Project Names
If the parameter SYNC_UPDATE_PROJECT_NAME has been added under the ERPLY sync parameters, the names of all synchronized projects will be updated automatically. Without this parameter, project names will not be updated, and ERPLY Books will retain the name that was originally assigned when the project was first created.
Assignments in ERPLY Inventory
If you use the Assignments module in ERPLY Inventory and want to assign projects to work orders, you need to add the following two parameters under the ERPLY sync parameters in ERPLY Books:
- ATTRIBUTE_ERPLY_SYNC_ADD_ASSIGNMENTS and
- ATTRIBUTE_ERPLY_SYNC_PROJECT_PARSER
For the second parameter:
- Enter ATTRIBUTE_ERPLY_SYNC_ASSIGNMENT in the Value column.
- Enter the Project Group ID in the Alt Value 2 column.
- Set Alt Value 4 to True.
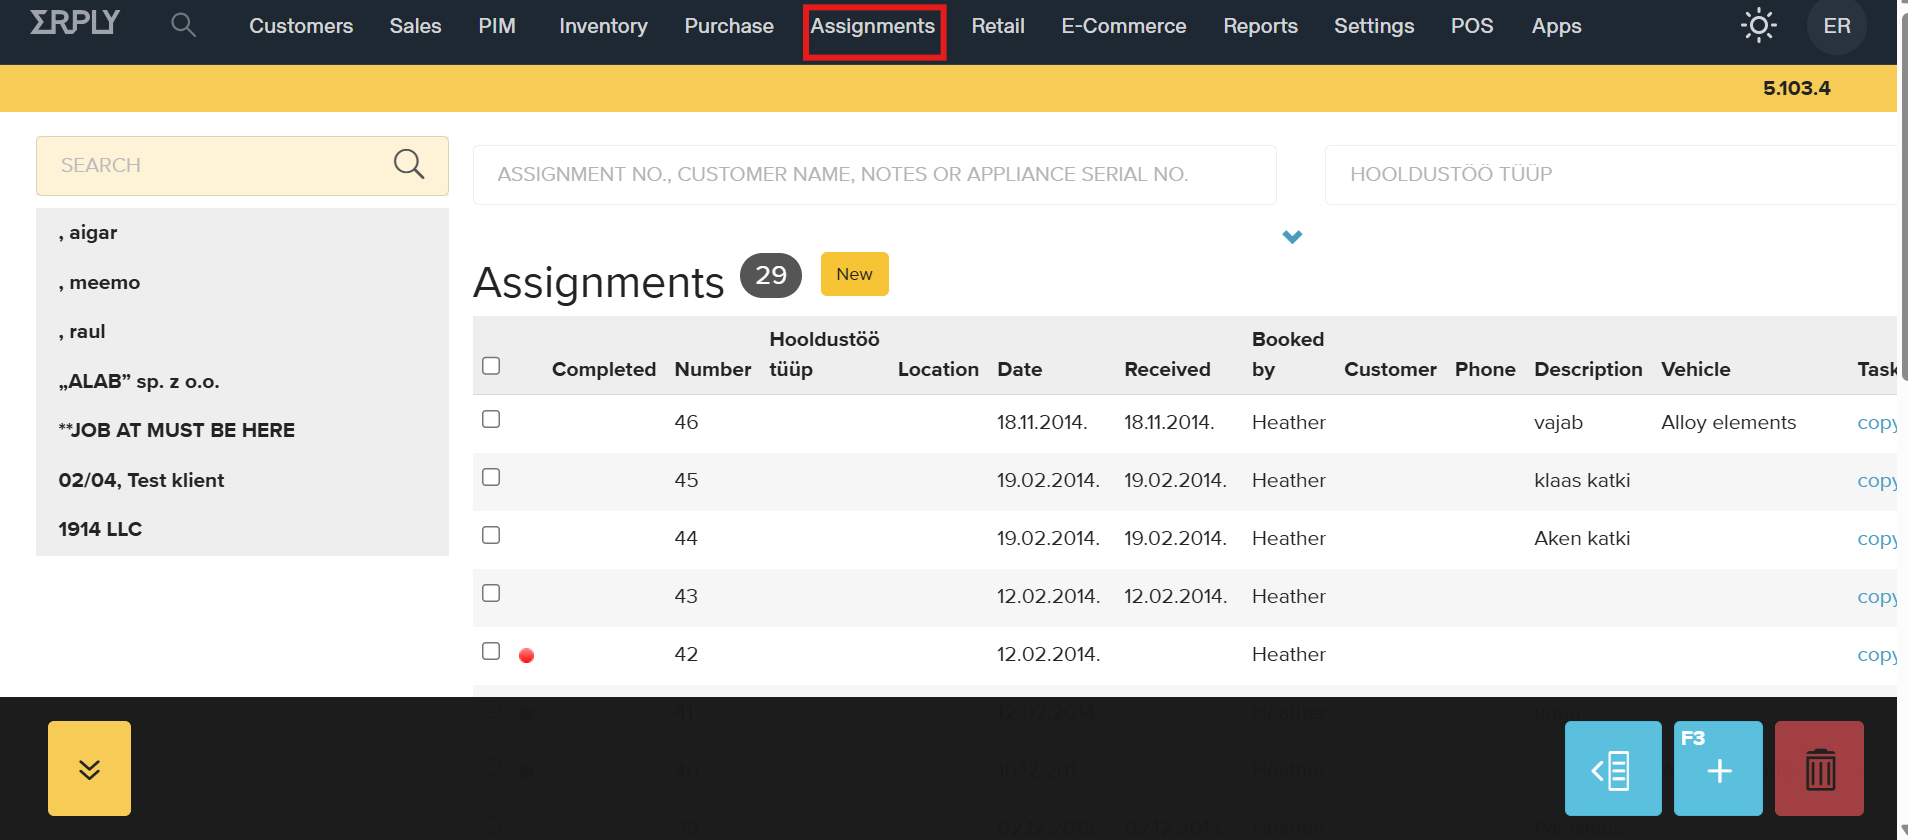
The Assignments module is shown in the image below.
Adding Records to Project Groups
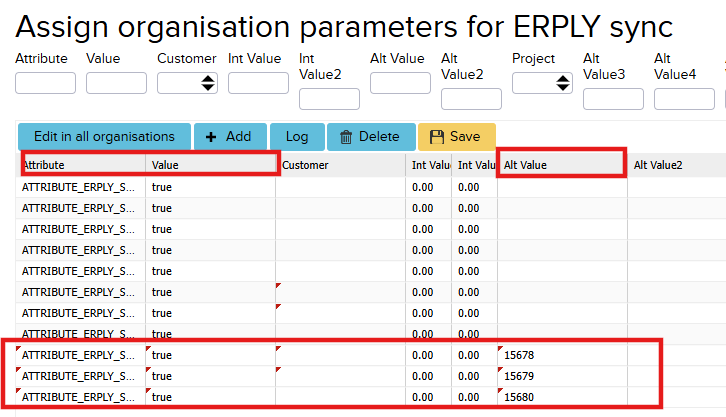
For projects, users, and warehouses, you can specify a Project Group ID in the Alt Value column of the corresponding synchronization parameter. This determines which project group newly synchronized projects, users, or warehouses will be added to. By default, newly synchronized projects, users, and warehouses are not assigned to any project group.
The available parameters are:
- ATTRBIUTE_ERPLY_SYNC_PROJECTS
- ATTRBIUTE_ERPLY_SYNC_USERS
- ATTRBIUTE_ERPLY_SYNC_WAREHOUSES
Simply enter the desired Project Group ID in the Alt Value column for the corresponding parameter.
Purchase or Sales Invoice Field as a Project
This rule can be used if you want to synchronize a specific field from a purchase invoice or sales invoice as a project.
Rule: SYNC_USE_DOC_FIELD_FOR_PROJECT
Value: Enter the invoice field that you want to use as the project name.
Possible values:
- applianceReference,
- ediStatus,
- ediText,
- fulfillmentStatus,
- trackingNumber
AltValue= If set to true, ERPLY Books will only use existing projects and will not create new ones automatically.
AltValue3= Project Group ID.
AltValue4= if set to true, sales documents will be excluded. Leave this field empty if you want sales documents to be included.
AltValue5= If set to true, purchase documents will be excluded. Leave this field empty if you want purchase documents to be included.
Global Parameters
Next, let’s look at the synchronization options available under Global Parameters. You can access Global Parameters by searching for “Global Parameters” from the main dashboard. One of the rules that can be added under Global Parameters is:
ATTRIBUTE_ERPLY_PRODUCT_COMPONENT_PROJECTS
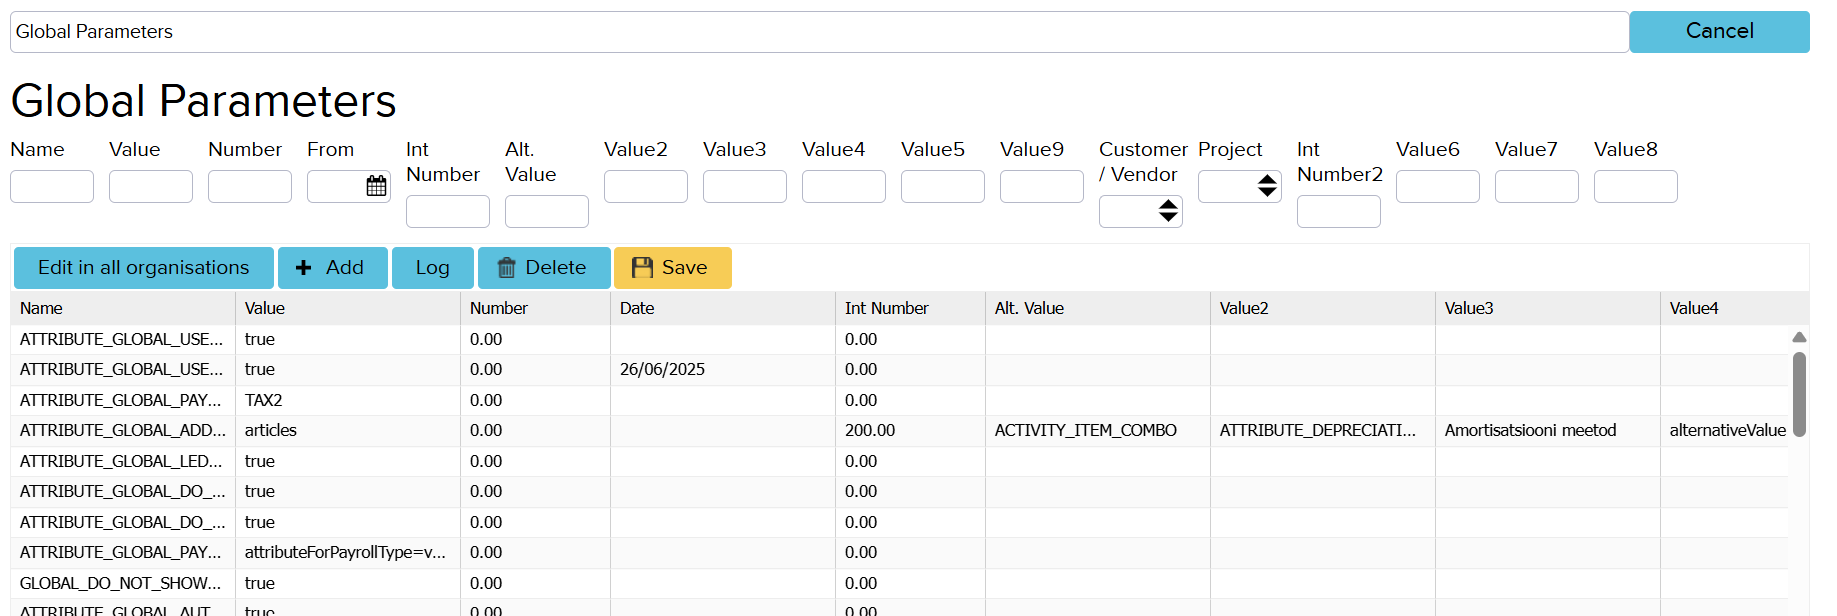
For this parameter, you can enter product components in the Value column. For example, in ERPLY Inventory, products can be categorized by product group, series, brand, or manufacturer. These values can then be synchronized into separate dimensions (projects) in ERPLY Books.This rule works by matching names. If a project with the corresponding name already exists, it will be selected automatically. If no matching project exists, ERPLY Books will create a new project with that name.
The following values can be used:
- brandName – brandID
- priorityGroupID – getProductPriorityGroups.
- manufacturerName
- groupID – groupName
- categoryID – categoryName
Preserving Invoice Rules During Synchronization
If you want invoice rules configured in ERPLY Books to be preserved when invoices are synchronized from ERPLY Inventory, you need to add the following rule under Global Parameters.
1. Open Global Parametersfrom the search box on the dashboard.
2. Add a new row:
Name: ATTRIBUTE_GLOBAL_ADDITIONAL_MODULE_ATTRIBUTES
Value: true
3. Save the changes and log out and back in for the setting to take effect
Using the Customer Address as a Project
If you want to use a customer’s address information as a project, add the parameter SYNC_CUSTOMER_ADDRESS_PROJECT under the ERPLY Sync Parameters (Assign organisation parameters for ERPLY syns). Only one part of the address can be synchronized as a project at a time: state, city, or country.
City as a Project – enter the following value in the Value field: State
City as a Project – enter the following value in the Value field: City
Country as a Project – enter the following value in the Value field: Country
For all of these options, you can also specify a Project Group ID in the Alt Value field. The synchronized address-based projects will then be assigned to that project group.
Customer Attributes
It is also possible to synchronize customer attributes as projects using the parameter:
ATTRIBUTE_ERPLY_SYNC_CUSTOMER_ATTRIBUTE_PROJECT
The setup of this functionality may vary depending on your requirements. For assistance with configuration, please contact customer support at support@erplybooks.com.
Payment Method as a Project
Payment methods can be synchronized as projects by adding the parameter:
ATTRIBUTE_ERPLY_SYNC_SAVE_PAYMENT_TYPE_AS_PROJECT
If the Value field is set to true and the Alt Value field contains a Project Group ID, ERPLY Books will determine the payment type for each payment transaction and assign it to the corresponding project. For example, payment type 400 represents Cash.
ERPLY Custom Module
SYNC_SAVE_APPLIANCE_AS_PROJECT– see parameter on Erply erimooduli jaoks. Kui soovid seda kasutama hakata, siis võta ühendust kasutajatoega support@erplybooks.com
SYNC_SAVE_APPLIANCE_AS_PROJECT – This parameter is intended for a custom ERPLY module. If you would like to use this functionality, please contact customer support at support@erplybooks.com.
Custom ERPLY Inventory Solutions
If you are using a custom ERPLY Inventory solution, you may need the parameter:
ATTRIBUTE_ERPLY_SYNC_PROJECT_PARSER
For example, your website may send documents to ERPLY Inventory and attach custom attributes that are not part of the standard ERPLY data structure. This rule allows ERPLY Books to look for a specific attribute on each synchronized document.
If the attribute is found, the transaction will be assigned to the project associated with that attribute. If no matching project exists, a new project will be created automatically.
Value: Enter the attribute name (for example, documentType).
Alt Value 2: Enter the Project Group ID.
Project Combinations
If you want to use project combinations, add the parameter:
ATTRIBUTE_ERPLY_SYNC_PROJECT_COMBINATIONS
To enable project combinations, enter the combination rules in the Value field.
This parameter allows you to create rules based on combinations of different dimensions, such as customers, projects, warehouses, products, and other synchronized attributes. For example, you can create a rule that applies only when a specific customer, warehouse, dimension, and product are used together.
To enable and configure this functionality, please contact customer support at support@erplybooks.com.
Supported Operators and Keywords
The following operators and keywords can be used in combination rules:
=— equals!— does not equal>— greater than zero / existsgroup— project group ID and its valuecustomerId— customer
Example Combination Rule
group500=29219|!group501|group502!=49823|customerProjectId=87218|customerProjectId!=87287|group505>0
Explanation of the Example:
group— refers to a project group.group500=29219— Project Group 500 must contain the value 29219.!group501— Project Group 501 must not have a value assigned.group502!=49823— Project Group 502 must not contain the value 49823.customerProjectId=87218— The customer project must be 87218.customerProjectId!=87287— The customer project must not be 87287.group505>0— A value must be selected in Project Group 505.
Using Document Type as a Project
It is also possible to synchronize the document type as a project by adding the following parameter under the ERPLY Sync Parameters:
ATTRIBUTE_ERPLY_SYNC_DOCUMENT_TYPE_PROJECT
This functionality allows transactions to be assigned to projects based on their document type during synchronization.
If you would like to use this feature, please contact customer support at support@erplybooks.com.
Automatically added projects
ERPLY Books also allows you to create project assignment rules and combinations that apply both in the user interface and during ERPLY synchronization.
To access this feature, search for ‘’Automatically added projects’’ from the dashboard search box.
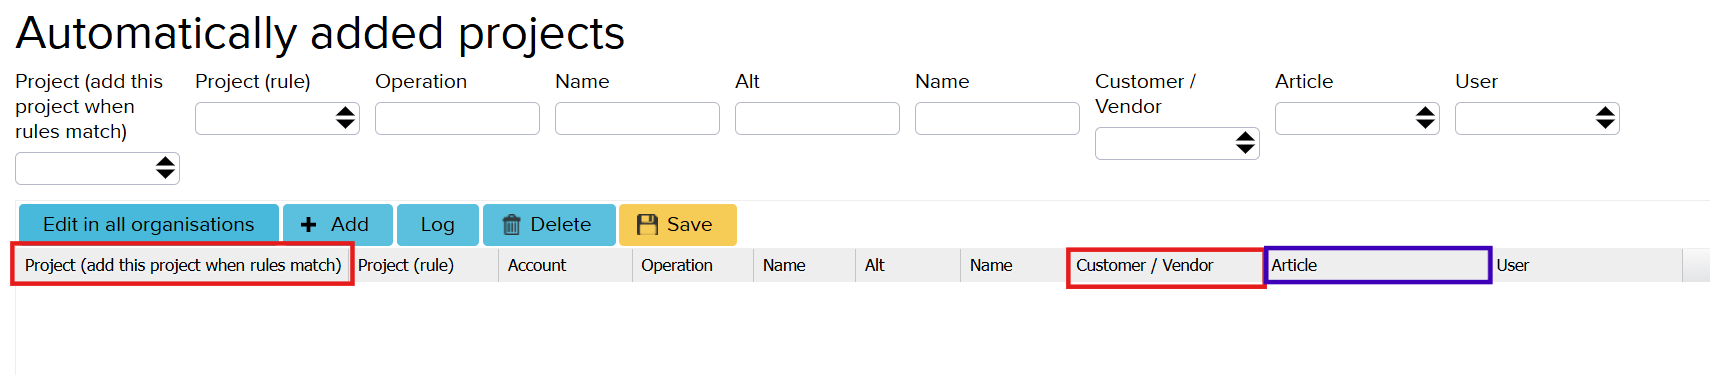
A project can be assigned either to a specific Article or to a Customer/Vendor.
- For products, select the product in the Article column.
- For customers or suppliers, enter the customer or supplier in the Customer/Vendor column and enter the corresponding project (dimension) in the Project column.
Link Product Group to a Project
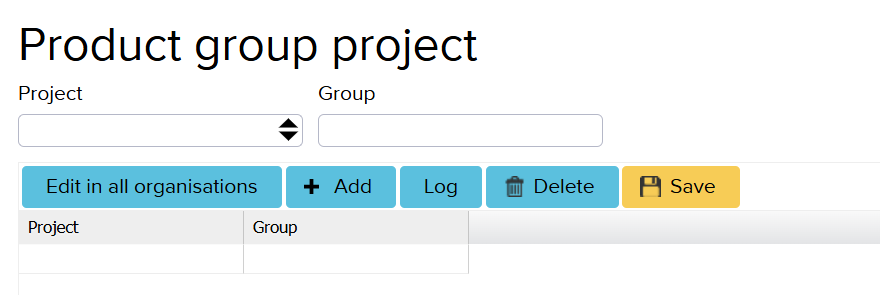
Product groups can also be linked to projects. To access this feature, search for ‘’Product group project’’ from the dashboard.
- In the Project field, select the project you want to link.
- In the Group column, enter the Product Group ID from ERPLY Inventory.
Kui kasutad aga Ühenda tootegrupp projektiga, siis selle parameetri puhul Erply laos tootegrupi nimetuse muutmisega tehakse uus dimensioon ERPLY Booksi, kui ei ole peal reeglit SYNC_UPDATE_PROJECT_NAME Erply süngi parameetrite all.
When using Link Product Group to Project, the Product Group ID remains fixed. If the product group name is changed in ERPLY Inventory, ERPLY Books will create a new project unless the SYNC_UPDATE_PROJECT_NAME parameter is enabled under the ERPLY Sync Parameters.
If SYNC_UPDATE_PROJECT_NAME is enabled, the existing project name will be updated instead of creating a new project.