Purchase and sales articles
This module describes purchase and sales articles in ERPLY Books. An article in ERPLY Books is a parameter/ attribute that works in the invoice module. It is possible to connect revenue, expense and fixed assets accounts with articles. In addition, you can determine whether its a purchase or sales invoice related article. You can find articles in “Sales”/ “Purchase” > “Purchase and Sales articles”. When you open this module, in the header, you can search articles by name, type (completed products, fixed assets, service) and which to show (show all, articles in sales invoice, articles in purchase invoice).
Purchase and sales articles types
- Completed products – articles that are related with inventory products
- Fixed assets – articles that are connected with fixed assets
- Service – articles that are related to services and non-inventory products
You can add new articles by clicking on “+” button. That will open an article sheet, where you can fill in the needed information. When you have already added the article and you want to change the information, then click on needed article and on the “Article Sheet” button or you can change the information on the article row.
Article filters
- Name – Article name
- Article in Sales invoice – Articles that are on sales invoice
- Article in Purchase Invoice – Articles that are purchase invoice
- Code – You can use this parameter for search
- Unit – kg, km, piece etc..
- Expense Account – Expense account that applies to this article
- Revenue Account – Revenue account that applies to this article
- Inventory/ Fixed Assets Account – You can add this on article sheet. This account will be added to completed products and fixed assets
- Depreciation Account – You can add this to fixed assets
- Type – completed products, fixed assets or service
- Base Price – Initial price (not obligatory)
- Markup – Extra Charge
- Price – Price with extra charge
- Tax – VAT %
- Asset Life in Months – Fixed Assets life in months
- Description – Extra information
- D Qty – Debet quantity
- C Qty – Credit quantity
Save, when you have added all the needed information.
If you want to delete an article, then choose the article and then click on the red trash bin mark. Then confirm the deletion by clicking on “Yes”.
When you create a new purchase or sales invoice and use an existing article, then the information that you have added in to the article module, will appear on the invoice (unit, revenue and expense account, tax).
If you want to use article descriptions on invoices, then go to “Settings” > “Configuration” and make a tick after “Use item descriptions in invoices?”. Then save and refresh the page. This feature means, that, for example, if you have an article “office items” and when you use it, you can add additional description on invoice like papers, pens, books, etc… If you don’t add this feature, then you can use the article, but the description cell will not appear on the invoice.
When you go to “Reports” > “Article report”, you can see a report about purchase and sales articles. You can see when you used some kind of article, with which invoice, who was supplier etc.
How can articles be used in invoices?
This manual describes how to set up rules for using articles in invoices. You can use rules to specify which articles can be used in invoices.
Examples of when it may be necessary to set a rule for the use of articles:
- Aluminum is included in the contract and you cannot put copper on the invoice based on that contract, but you can, for example, add the dirt that came with the aluminum in the truckload.
- No dangerous waste or stainless materials may be sold to private individuals.
To add rules, go to General Settings (Settings -> Configuration) and look for the heading “How articles can be used in invoices”.

Next, click on the blue ”Manage” button and in the window that opens you can add rules. There is one line for each rule and it is possible to add as many rules as needed. Rules only apply to documents that affect the inventory.
Clicking on the ‘Add’ button will add a new row where you have to fill in the columns about the article.

- Article – select the article to which the rule applies
- Customer/Supplier – select the customer/supplier to which the rule applies
- Type – select the type of document to which the rule applies.
- Value – enter the value to apply the rule to (e.g. select MAX_QUANTITY from the type and enter 5000 in the value field here).
Once you have added the rules, save the changes and refresh the page for the rules to apply.
Different types that can be used
In the type field, it is possible to set up rules for the use of arithmetic keys for the following document types:
- “MAX_QUANTITY” – max quantity that can be added on the invoice.
- “MIN_QUANTITY” – min quantity that can be added on the invoice.
- “NO_PURCHASES” – may not buy this product.
- “NO_SALES” – may not sell this product.
- “LEGAL_PERSON_ONLY_VIA_CONTRACT” – if there is a legal person, this product may only be bought/sold under contract.
- “PRIVATE_PERSON_NO_PURCHASES” – This product may not be purchased from a private individual.
- “PRIVATE_PERSON_NO_SALES” – This product may not be sold to a private individual.
- ‘ONLY_CONTRACT_PURCHASES’ – This product may only be purchased on a contract basis.
- ‘IF_BASE_IS_CONTRACT_THEN_ONLY_CONTRACT_CONNECTION’ – if the document is based on a contract, this product must be included in the contract.
- ‘USE_CONTRACT_FIXATION’ – the product cannot be included without a specific contract fixation.
How to synchronize all products and quantities from the warehouse?
This manual describes the process of how to synchronize all products and quantities from the warehouse.
NB! This option can only be used if there are less than 5,000 products.
Configuration
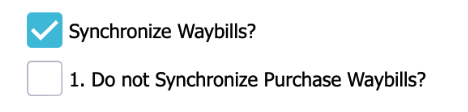
First, open the ERPLY POS & Inventory Settings (Settings -> ERPLY POS & Inventory Settings) and check that rule no. 1. Do not Synchronize Purchase Waybills? would not be activated and the rule “Synchronize Waybills?” would be activated:
The following section describes the rules that need to be included under the ERPLY dark parameters.
To do this, open “Assign organization parameters for ERPLY sync” on the main page. To add a new line, press the blue “Add” button.
If you want all products to be shown under the articles
- Attribute=ATTRIBUTE_ERPLY_SYNC_GET_ALL_PRODUCTS
- Value=true
If you want the invoice rows to be synchronized with quantities
- Attribute= ATTRIBUTE_ERPLY_SYNC_GET_ALL_UNIQUE_ROW_NAMES
- Value= true
- AltValue= true -> synchronizes sales
- AltValue2= true -> also synchronizes purchases
If you want the synchronization of products from the warehouse not to create a consolidated invoice
- Attribute= SYNC_INVOICE_ONLY_MAIN_ARTICLE
- Value= true
How to synchronize specific product fields from the inventory to an ERPLY Books article?
By default, the name and code cell are synchronized for the product’s article code from the warehouse. However, by adding a corresponding rule, it is possible to add more specific product fields to the article.
By default, three additional fields can be added:
- Code2
- Code3
- Code4
To add additional fields when synchronizing an article, you need to add a rule under Global Attributes.
- Open Global Parameters from the search box on the main page
- Add a new row
- Name=SYNC_SET_ARTICLE_CODES
- Value = true
- Altvalue2 = a field to be added under code2
- Altvalue3 = a field to be added under code3
- Altvalue4 = a field to be added under code4
All possible values that can be added under the code cell are:
- code2,
- code3,
- groupName,
- supplierCode,
- code5,
- code6,
- code7,
- code8,
- brandName,
- categoryName,
- nameENG (this is necessary, for example, when synchronizing waste codes if they are in the categoryName cell)