Transaction templates
By default, ERPLY Books prepares the invoice and the receipts-payments transactions according to the logic defined in the program. For example, in the case of a purchase invoice, the following transaction is made:
C: Accounts payable
D: expense, inventory, fixed assets account
D: input VAT
The accounts can be modified as needed.
However, if you do not like the logic of the transactions and need to create a transaction with a different logic, you can use the transaction templates. This allows you to define which transactions should be created relying on the conditions you specify.
Transaction templates consist of two parts:
- Transaction template – specifies the conditions under which a different transaction will be created.
- Transaction template elements – determines which transaction will be created when these conditions are met.
How are transaction templates created?
To create a transaction template, log in, open “Settings” > “Configuration” > “Transaction template”. Click on the “Manage” button and a window will appear where you can specify the conditions that must be met in order for the program to use this transaction template. For example, in the following example, the transaction template has been set to “Specific case transaction”, which will be applied to all sales invoices issued to Customer 1.

- Enable
Yes – the transaction template is activated
No – the transaction template is not activated
- Document type – select the document type for which this transaction template is to be used.
- Use only in invoices?
Yes – only invoices will be checked.
No – is not related to invoices
- Use with payments?
Yes – only used with payments
No – not used with payments only
- Type of payment – select the type of document for which this transaction template will be used
- Customer / Vendor
Blank – the customer/vendor is not controlled
Selected – the transaction template is only used if the invoice/payment specifies the customer/vendor
- Project
Blank – the project is not controlled
Selected – if selected, checks whether the specified project exists. If the object does not contain this project, this transaction template will not be selected.
- Account
When making payments, the cash account will be checked
In the case of a sales invoice, the line revenue account will be checked, and in the case of a purchase invoice, the expense account will be checked
- Name – select the name you have created to be used in the next step when you specify “Transaction template elements”.
- Cash In / Cash Out
Blank: does not check the amount of the transaction
Income: checks that the transaction amount would be negative.
Outflow: checks that the transaction amount would be positive
When all fields are filled in, press the “Save” button and refresh the page.
Transaction template elements
If the transaction template has been created under Configuration, type in the search field on the main page: ‘’Transaction Template Elements’’. In the opened module, you can enter information about the elements. Transaction lines for the transaction are created here. The specified formula is applied only to transactions for which the corresponding transaction template is found and its conditions are met.

The following must be completed for each entry line:
Select – select a transaction template (created under Configuration)
Name – the name of the element for internal use (you can name it yourself)
Formula – see more under creating a formula
Account – specify an account for each row
Debit – select ‘’Yes’’ or ‘’No’’
Add article name – write the name yourself
Creating formulas
You can create a formula for each transaction row using the following elements.
The following elements are taken from the invoice:
- discount – discount percentage
- vat – VAT percentage
- quantity – quantity on the invoice line
- expense – cost of goods
- price – invoice line price
- sumNoVat – net amount of the invoice line (price * quantity * (1 – discount))
- sumWithVat – total amount on the invoice line (price * quantity * (1 – discount) * (1 + vat))
The following elements are taken from the payment transactions:
- sumPaid – amount paid
- currencyRate – currency rate
- vatSum – VAT amount
- currencyExchangeLoss – loss due to a change in the exchange rate
After adding the rows, press the “Save” button and refresh the page.
An example of selling used goods
In the case of used goods, the profit margin is taxed, i.e. the difference between the sale and purchase price, which has been reduced by the VAT included in it.
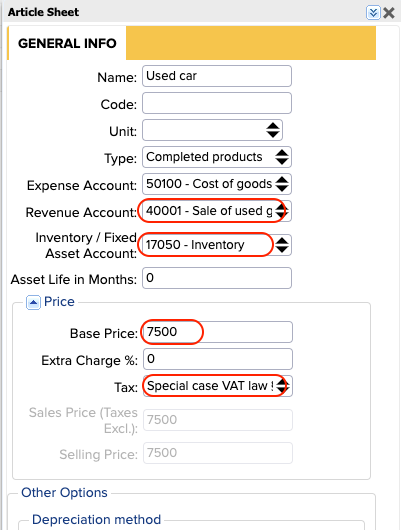
Taxation can be done by creating a sales invoice. It is important that before entering the sales invoice, the purchase price of the goods has also been entered in the program in order for it to be able to calculate the profit margin. Enter the purchase price on the article card.
In the following example, a used car is bought from a private person for 7,500 euros and is resold for 10,000 euros. In this case, the taxable amount is: (10,000-7,500)/1.2 = 2,083.33 eur and the VAT is 416.67 eur.
For such a transaction, proceed as follows:
- Open “Settings” > “Tax Rates” and create a new VAT type, for example with the name “Special case VAT law §41”. Select 0% as the percent, “Exception” as the type, and set up the revenue account so that when using this VAT type, the sales revenue would always be reflected in the account specified here.
![]()
- Open “Purchase” > “Sales and Purchase articles” and create a new article where you specify the accounts, base price (purchase price) and VAT type.
- Open “Settings” -> “Configuration” -> “Transaction template”, press “Manage” and fill in the following fields.

In the previous image, a transaction template called “Commission sale” has been created. This applies only to sales invoices and to those accounts where account 40001 has been used. NB: If commission sales are made at the cash register, you must also add a second line where the document type is “Cash sales invoice” – leave the revenue account the same.
- Type “transaction template elements” into the search box on the homepage and fill in the lines as shown below.
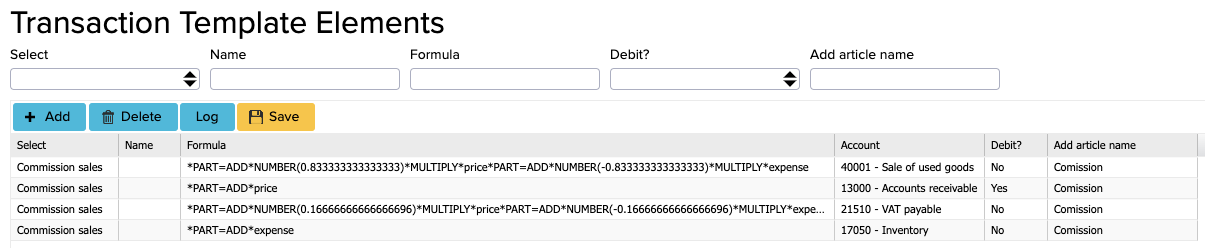
In the “Select” box, select the newly created entry template “Commission sales”, specify the formulas and accounts and whether it is a debit account or not.
Formulas:
*PART=ADD*NUMBER(0.833333333333333)*MULTIPLY*price*PART=ADD*NUMBER(-0.833333333333333)*MULTIPLY*expense
*PART=ADD*price
*PART=ADD*NUMBER(0.16666666666666696)*MULTIPLY*price*PART=ADD*NUMBER(-0.16666666666666696)*MULTIPLY*expense
*PART=ADD*expense
- Then create a sales invoice, enter the sales price and select the type of VAT. VAT is not shown on the sales invoice, it is shown in the financial transaction.

- The program creates the following financial transaction for the sales invoice:

NB: In this example, the VAT does not reach the VAT Declaration report and must be added manually. If you have used goods sales transactions as your main activity and you would like a VAT reporting solution developed for your company, please contact us at info@erplybooks.com.