Contract-based budgeting
Contract-based budgeting is budgeting that is based on articles. This is a useful tool for everyone who does work for the client based on quotations and wants to keep their own expenses under control. Once you start doing the work, you will be able to monitor, for example, how much electricity, fuel, labor cost, building materials, etc. are used.
How to do contract-based budgeting?
Contracts module activation
In order to start using contract-based budgeting, you need to activate the contracts module. See here how to do that.
Needed plugins
You need the Project Report plugin for contact-based budgeting. More information about this can be found here.
Purchase and sales articles
It is necessary to set up purchase and sales articles in contract-based budgeting in order to see performance across them and to compare them. Articles can be added in the ‘’PURCHASE’’ or ‘’SALES’’ module under the ‘’Purchase and Sales Articles’’ menu.
On a new line you can add the article’s name, select which articles are related to the sales and/or purchase invoice, the base price, etc. You can read more about purchase and sales articles here. Creating articles here is necessary for compiling sales contracts, sales and purchase invoices.
NB! Save the changes and refresh the page.

Adding Project Groups
For adding project groups, open (Settings -> Initial Data -> Project Groups), click the ‘’+’’ button and add project groups with your chosen names. In the picture, project groups are defined as ‘’Departments’’, ‘’Machines’’ and ‘’Objects (contracts)’’.
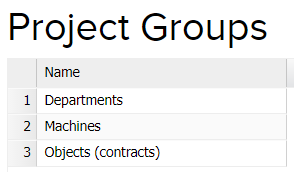
In the case of contract-based budgeting, it’s necessary to add a project group with the name ‘’Objects (contracts)’’, so when you enter sales contracts or sales and purchase invoices, a project group with the name ‘’Objects (contracts)’’ will appear instead of the usual project. In this way, it is possible to link the invoice to a specific project group and project.
Adding Projects
Projects can be added manually or automatically by adding the rule ‘’Contract as a new project’’. In contract-based budgeting, it would be advisable to add the rule that automatically turns a new contract into a new project. You can read here about adding this rule under the subitem ‘’Contract as a new project’’.
Sales contract and Sales invoice compilation
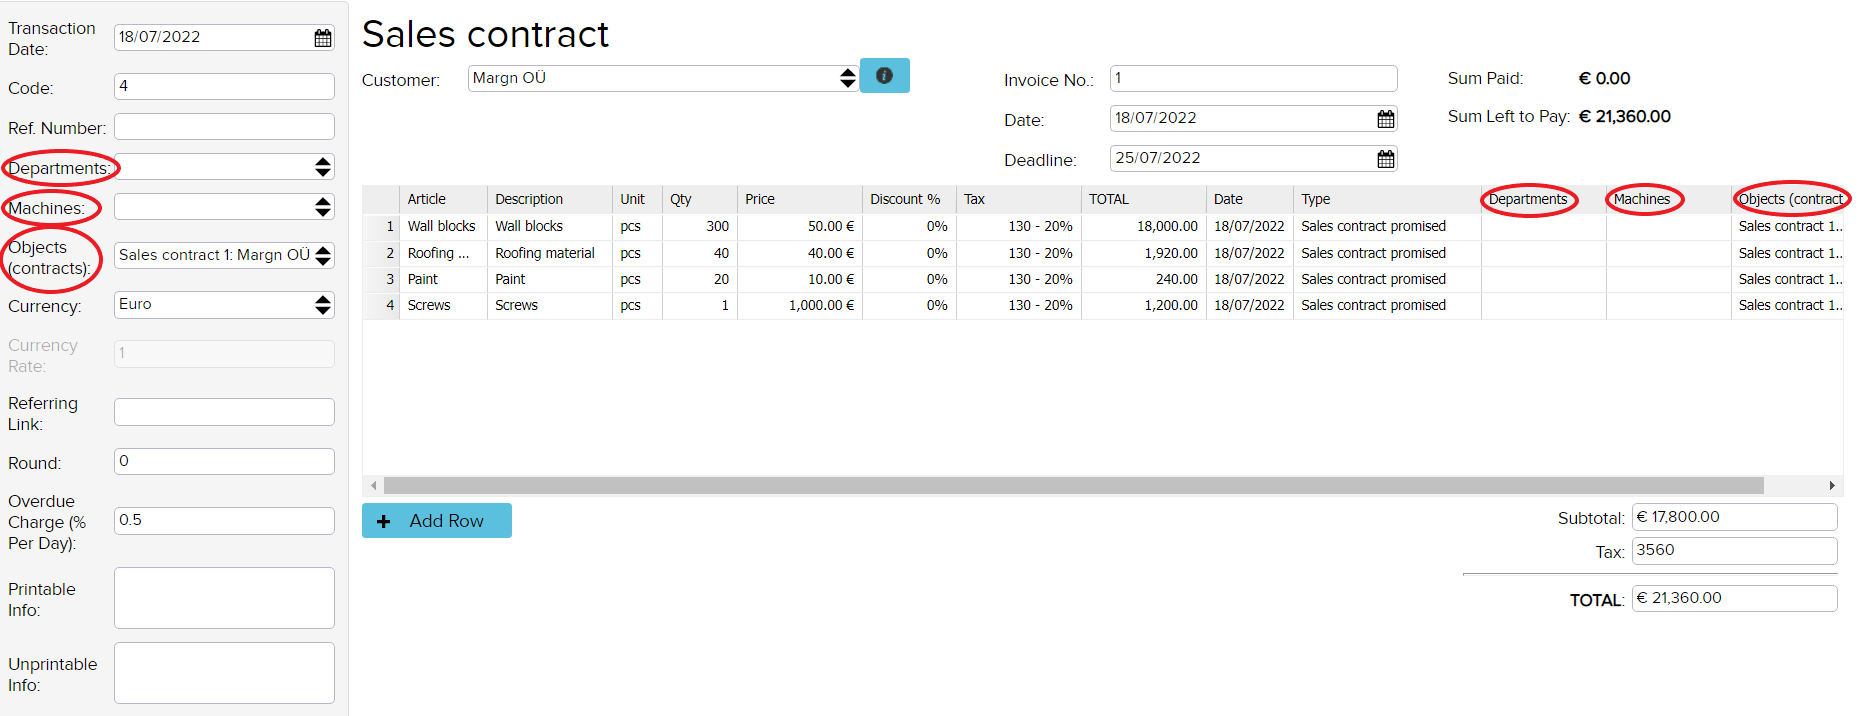
In the case of budgeting, the sales item is a prognosis or even a guess as to the amount of building materials that will be required to build a house, for example. A sales contract looks the same as the invoice document. If you have added an article, the information that you have saved for this article in the ‘’Purchase-sale articles’’ menu will appear on the invoice.
If necessary, change the data in the cells, for example the quantity. The ‘’Objects (contracts)’’ cell will be filled after saving when you open this sales contract again (Sales -> Contracts).
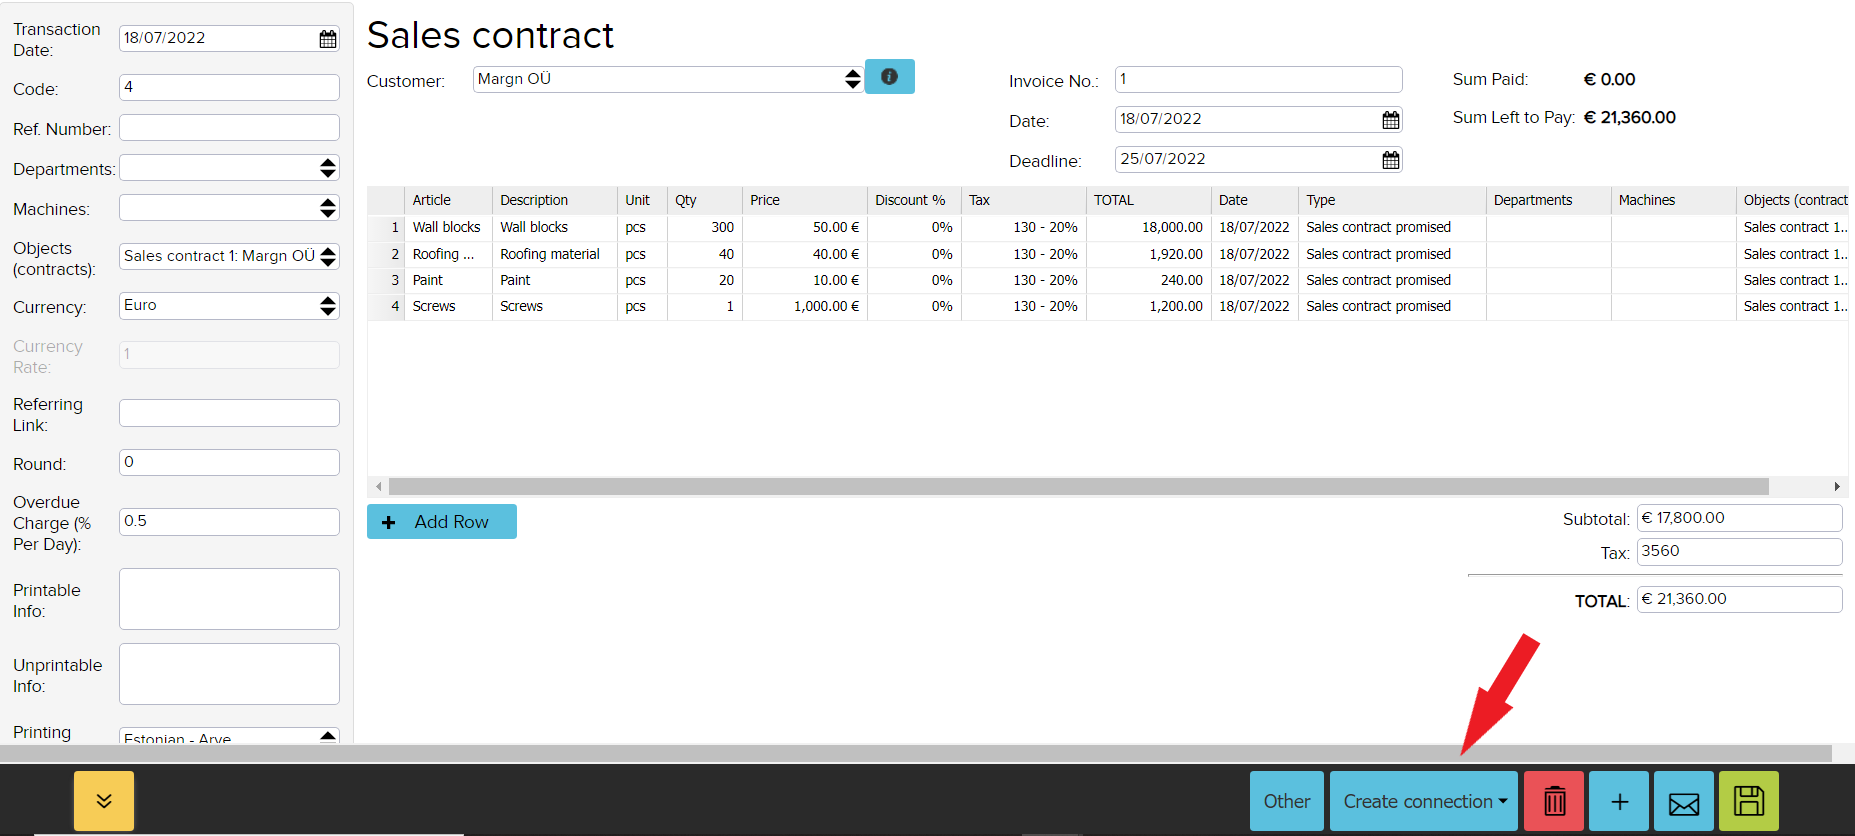
If you have finished compiling the sales contract, save it. Sales invoices can be created after a sales contract has been saved. To create a sales invoice, press the button ‘’Create connection’’ -> ‘’Create invoice’’ in the submenu below.
The sales invoice will show in the budgeting how much building material, for example, has actually been sold to customers.
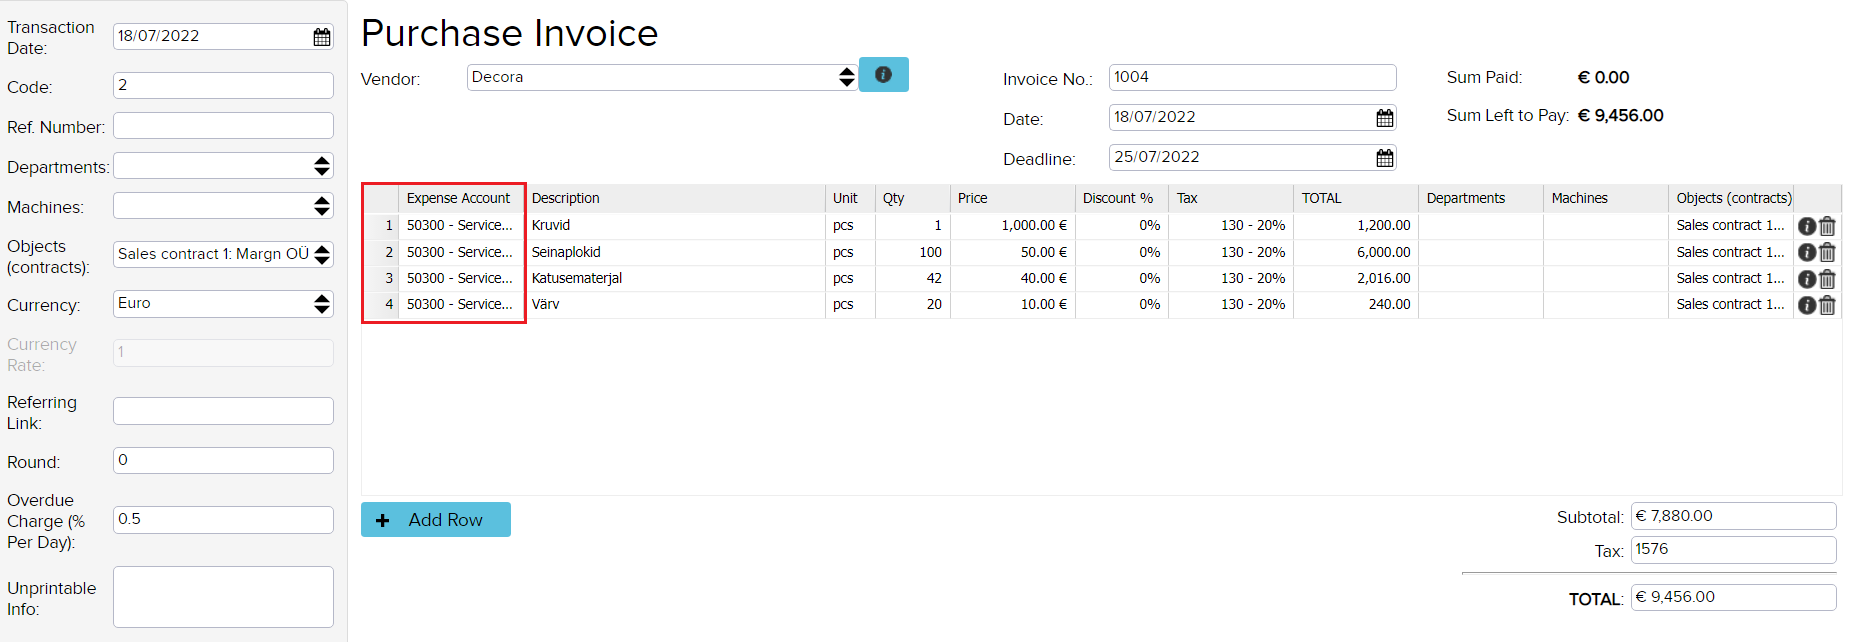
Purchase invoice compilation
The purchase invoice in budgeting shows how much and at what price, for example, building material was actually purchased. To add a purchase invoice, open ‘’Purchase -> Purchase invoice (add new) -> Purchase invoice’’.
NB: If you don’t see any articles under purchase invoices, you first need to open ‘’Settings -> Configuration’’ and remove rule number 18.
![]()
Before creating a purchase invoice, a sales contract must be ready to link the purchase invoice to the sales contract. In the ‘’Objects (contracts)’’ field, you need to select the relevant sales contract. When the purchase invoice is ready, save the changes and refresh the page.
Budget management
If the sales contract, purchase and sales invoice have been drawn up, you can check the budgeting in the report generator or add JSON.
To add JSON, go to the dashboard and search ‘’Parameters for Report Generator Saved Reports’’.
- In the name cell write your chosen name.
- In the value cell write JSON.
- In the type cell write a name for this report (Reports -> Saved reports (from there you can see the saved report)).
JSON example:
{“parameters”:[{“rules”:[{“tableName”:”ARTICLE_ROW”,”fieldName”:”DEL_USER_ID”,”referenceType”:”IS_NULL”,”value”:””}],”index”:0},{“rules”:[{“tableName”:”DOCUMENT_PROJECT”,”fieldName”:”project_id”,”referenceType”:”IN”,”value”:”170857″}],”index”:1},{“rules”:[{“tableName”:”DOCUMENT”,”fieldName”:”TYPE_CODE”,”referenceType”:”IN_OR”,”value”:”DOCUMENT_SELL”},{“tableName”:”DOCUMENT”,”fieldName”:”TYPE_CODE”,”referenceType”:”IN_OR”,”value”:”DOCUMENT_SALES_CONTRACT”},{“tableName”:”DOCUMENT”,”fieldName”:”TYPE_CODE”,”referenceType”:”IN_OR”,”value”:”DOCUMENT_BUY”}],”index”:2}],”additionalColumns”:”ARTICLE_ROW.ROW_SUM=Contract_SUM|ARTICLE_ROW.ROW_SUM=Sales_SUM|ARTICLE_ROW.ROW_SUM=Purchase_SUM”,”columnPositionAndVisibilty”:[{“dataIndex”:”ARTICLE_NAME”,”column”:0,”text”:”Articles.Name”,”width”:150,”hidden”:false},{“dataIndex”:”Contract_SUM”,”column”:1,”text”:”Contract_SUM”,”width”:150,”hidden”:false},{“dataIndex”:”Sales_SUM”,”column”:2,”text”:”Sales_SUM”,”width”:150,”hidden”:false},{“dataIndex”:”Purchase_SUM”,”column”:3,”text”:”Purchase_SUM”,”width”:150,”hidden”:false},{“dataIndex”:”Purchase_Difference”,”column”:4,”text”:”Purchase_Difference”,”width”:152,”hidden”:false},{“dataIndex”:”Purchase_Difference %”,”column”:5,”text”:”Purchase_Difference %”,”width”:331,”hidden”:false}],”storeParameters”:””,”formulaColumns”:”Purchase_Difference:*PART=ADD*NUMBER(-1)*MULTIPLY*Purchase_SUM*PART=ADD*Contract_SUM|Purchase_Difference %:*PART=ADD*Purchase_SUM*PART=DIV*Contract_SUM”,”outputLayout”:””,”limit”:””,”start”:””,”summaryRowField”:”ARTICLE.NAME”,”groupByOnDBLevel”:true,”groupByFinal”:””,”organisationIds”:””,”tables”:”ARTICLE_ROW|ARTICLE|DOCUMENT|DOCUMENT_PROJECT”,”output”:”ARTICLE.NAME|ARTICLE_ROW.ROW_SUM”,”groupBy”:”ARTICLE.NAME”}
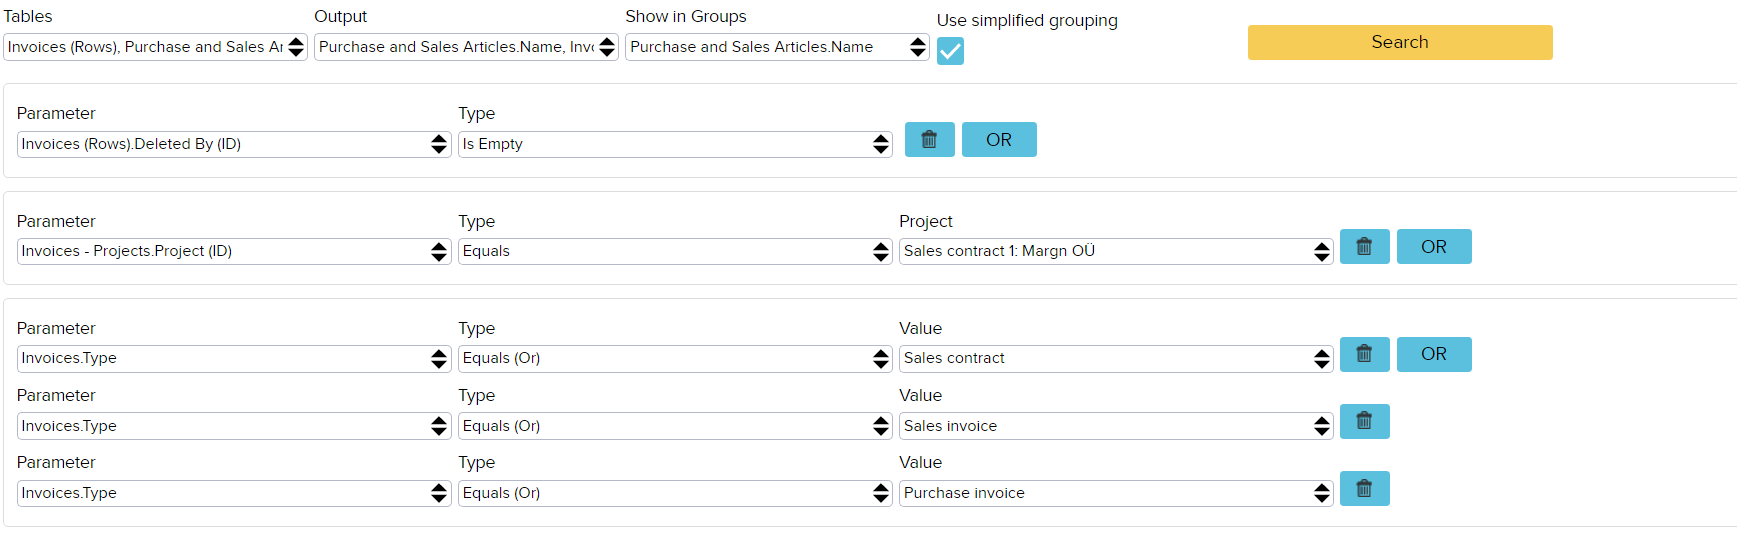
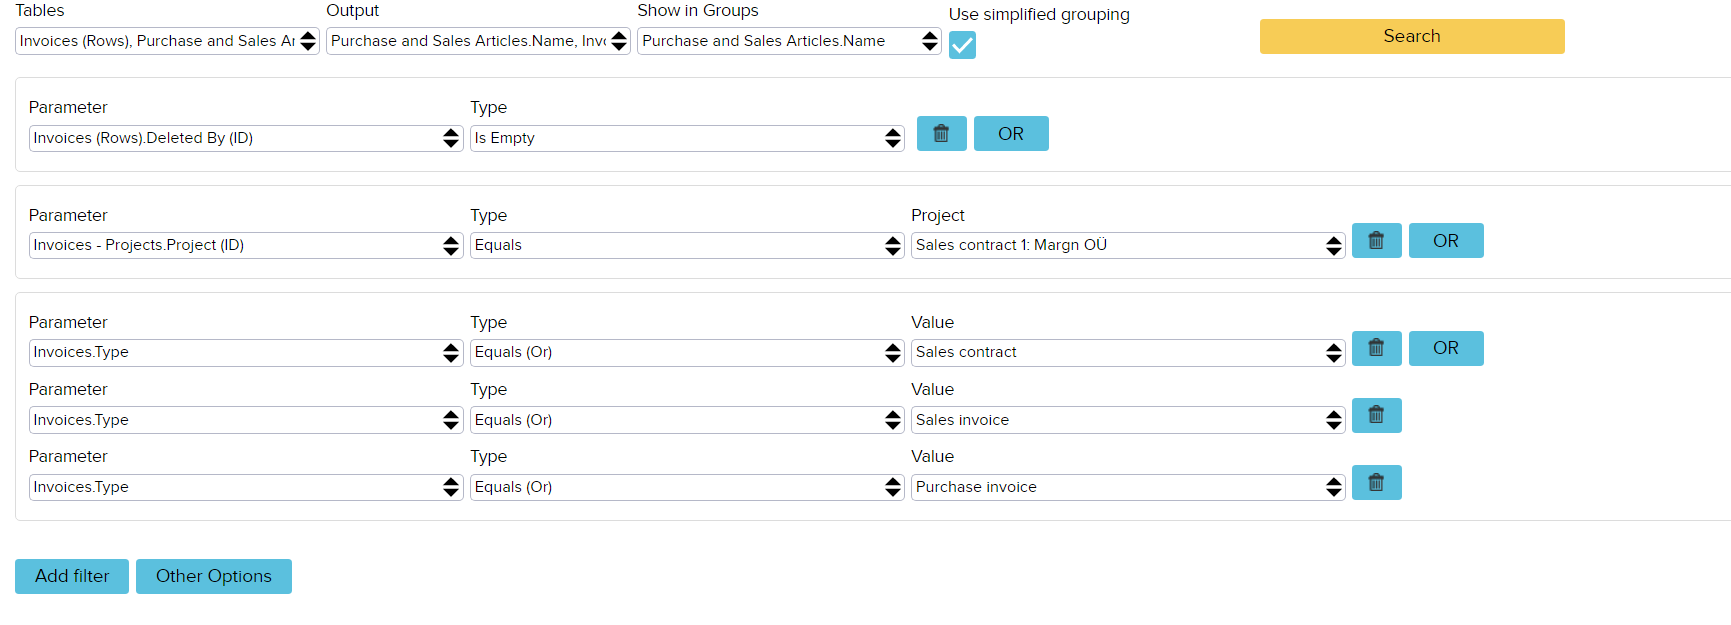
If you compile a report in the report generator, open ‘’Reports -> Report generator -> Report generator’’.
Add:
- Table cell: Invoices (Rows), Purchase and Sale articles, Invoices, Invoices – Projects
- Output cell: Purchase and Sale articles.Name, Invoices (Rows).Sum
- Show in Groups cell: Purchase and Sale articles.Name
Add the sales contract with which you have linked the purchase invoice as a project.
Based on the report, you will be able to see the name of the article, the prognosis, the reality and the purchased difference both in euros and in percentages. For example, we assumed that 1,600 euros would be spent on roofing materials, but in reality it was 1,680 euros, which is more than we expected. Therefore, the purchase difference is -80 euros or 105%. This means that we have fulfilled 105% of the roofing materials budget.

If the report is saved, it will later be available under the custom reports (Reports -> Report generator -> Custom reports -> Contract result). It is also possible to compile a report in order to see the quantitative result of the contract, i.e. how much has been bought/sold in quantities.
This report can be done in the same way in the report generator or adding JSON.
JSON example:
{“parameters”:[{“rules”:[{“tableName”:”ARTICLE_ROW”,”fieldName”:”DEL_USER_ID”,”referenceType”:”IS_NULL”,”value”:””}],”index”:0},{“rules”:[{“tableName”:”DOCUMENT_PROJECT”,”fieldName”:”project_id”,”referenceType”:”IN”,”value”:”168916″}],”index”:1},{“rules”:[{“tableName”:”DOCUMENT”,”fieldName”:”TYPE_CODE”,”referenceType”:”IN_OR”,”value”:”DOCUMENT_SALES_CONTRACT”},{“tableName”:”DOCUMENT”,”fieldName”:”TYPE_CODE”,”referenceType”:”IN_OR”,”value”:”DOCUMENT_SELL”},{“tableName”:”DOCUMENT”,”fieldName”:”TYPE_CODE”,”referenceType”:”IN_OR”,”value”:”DOCUMENT_BUY”}],”index”:2}],”additionalColumns”:”ARTICLE_ROW.QUANTITY=Contract_SUM|ARTICLE_ROW.QUANTITY=Sales_SUM|ARTICLE_ROW.QUANTITY=Purchase_SUM”,”columnPositionAndVisibilty”:[{“dataIndex”:”ARTICLE_NAME”,”column”:0,”text”:”Articles.Name”,”width”:150,”hidden”:false},{“dataIndex”:”Contract_SUM”,”column”:1,”text”:”Contract_SUM”,”width”:150,”hidden”:false},{“dataIndex”:”Sales_SUM”,”column”:2,”text”:”Sales_SUM”,”width”:150,”hidden”:false},{“dataIndex”:”Purchase_SUM”,”column”:3,”text”:”Purchase_SUM”,”width”:150,”hidden”:false},{“dataIndex”:”Purchase_Difference”,”column”:4,”text”:”Purchase_Difference”,”width”:100,”hidden”:false},{“dataIndex”:”Purchase_Difference %”,”column”:5,”text”:”Purchase_Difference %”,”width”:100,”hidden”:false}],”storeParameters”:””,”formulaColumns”:”Purchase_Difference:*PART=ADD*NUMBER(-1)*MULTIPLY*Purchase_SUM*PART=ADD*Contract_SUM|Purchase_Difference %:*PART=ADD*Purchase_SUM*PART=DIV*Contract_SUM”,”outputLayout”:””,”limit”:””,”start”:””,”summaryRowField”:”ARTICLE.NAME”,”groupByOnDBLevel”:true,”groupByFinal”:””,”organisationIds”:””,”tables”:”ARTICLE_ROW|ARTICLE|DOCUMENT|DOCUMENT_PROJECT”,”output”:”ARTICLE.NAME|ARTICLE_ROW.QUANTITY”,”groupBy”:”ARTICLE.NAME”}
If you add a report in the report generator, you first need to open (Reports -> Report generator -> Report generator).
Add:
- Table cell: Invoices (Rows), Purchase and Sale articles, Invoices, Invoices – Projects
- Output cell: Purchase and Sale articles.Name, Invoices (Rows).Qty
- Show in Groups cell: Purchase and Sale articles.Name
Add the sales contract as a project.
The quantity report looks the same as the report in euros. For example, we expected that 300 pcs of wall blocks would go, but actually 100 pcs were sold, which is less than we expected. That’s why the purchase difference is 200 pcs and 33%. This means that we have fulfilled 33% of the roofing materials budget.

Later, this report can be seen in ‘’Reports -> Report Generator -> Saved Reports -> Contract result quantities’’.